Customize the Launch Dashboard
You can customize your dashboard by reordering the links that display and creating custom sections.
Reorder Links
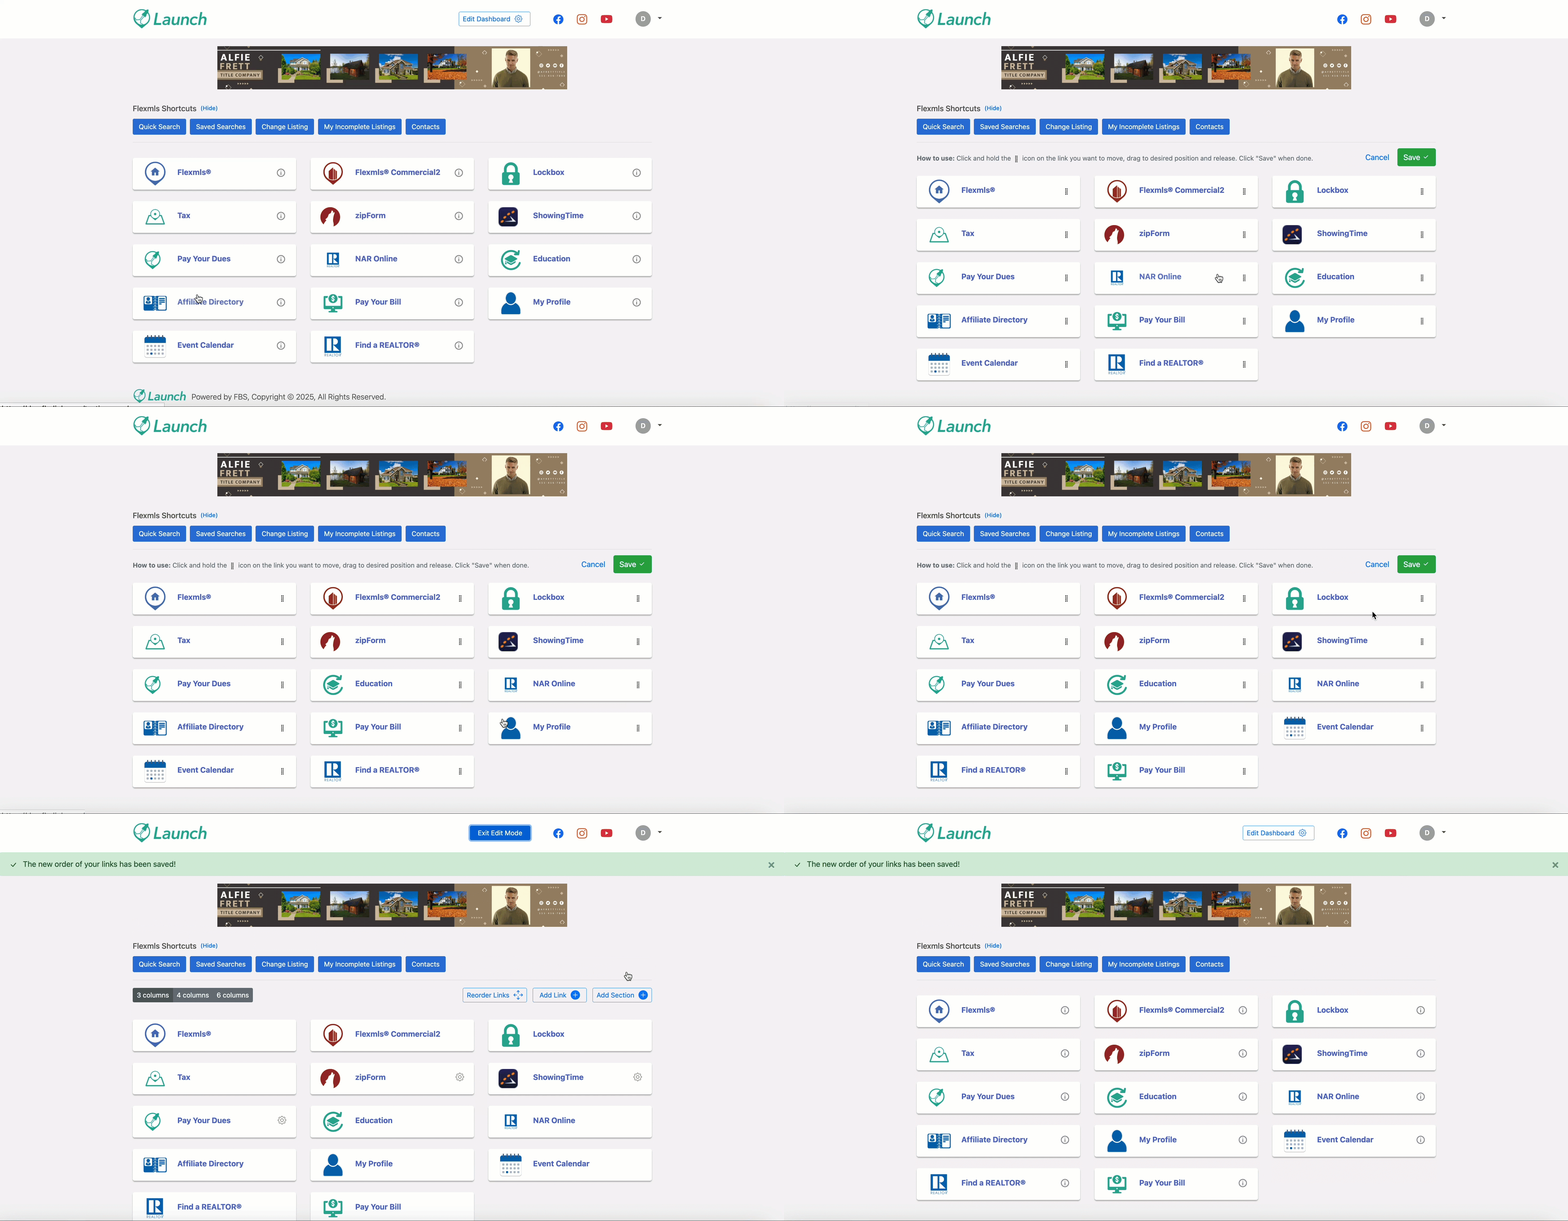
You can customize the order that your links display in the dashboard. To start, click Edit Dashboard to go into Edit Mode, and then click Reorder Links. From there, you are prompted with instructions on how to reorder the app tiles. Drag and drop your links into your desired order. When you have finished reordering your links, save your changes by clicking the green Save button.
Create Custom Links and Sections
You can also create custom links, and custom sections to organize your links, for the entire MLS. Associations can also create sections for links, but they can only do so for association-level links. They do not have control over any sections created at the MLS-level.
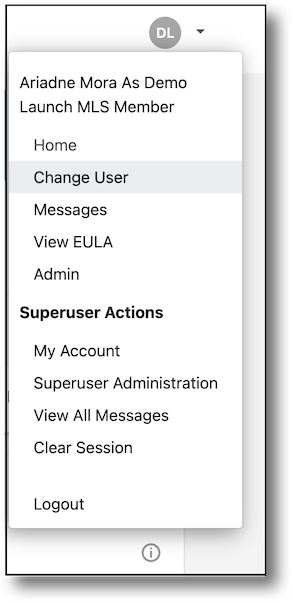
To create a section, first make sure you are superusing as the root MLS/Association account. In Launch, click the profile icon at the top right corner of the screen, and select Change User from the dropdown menu.
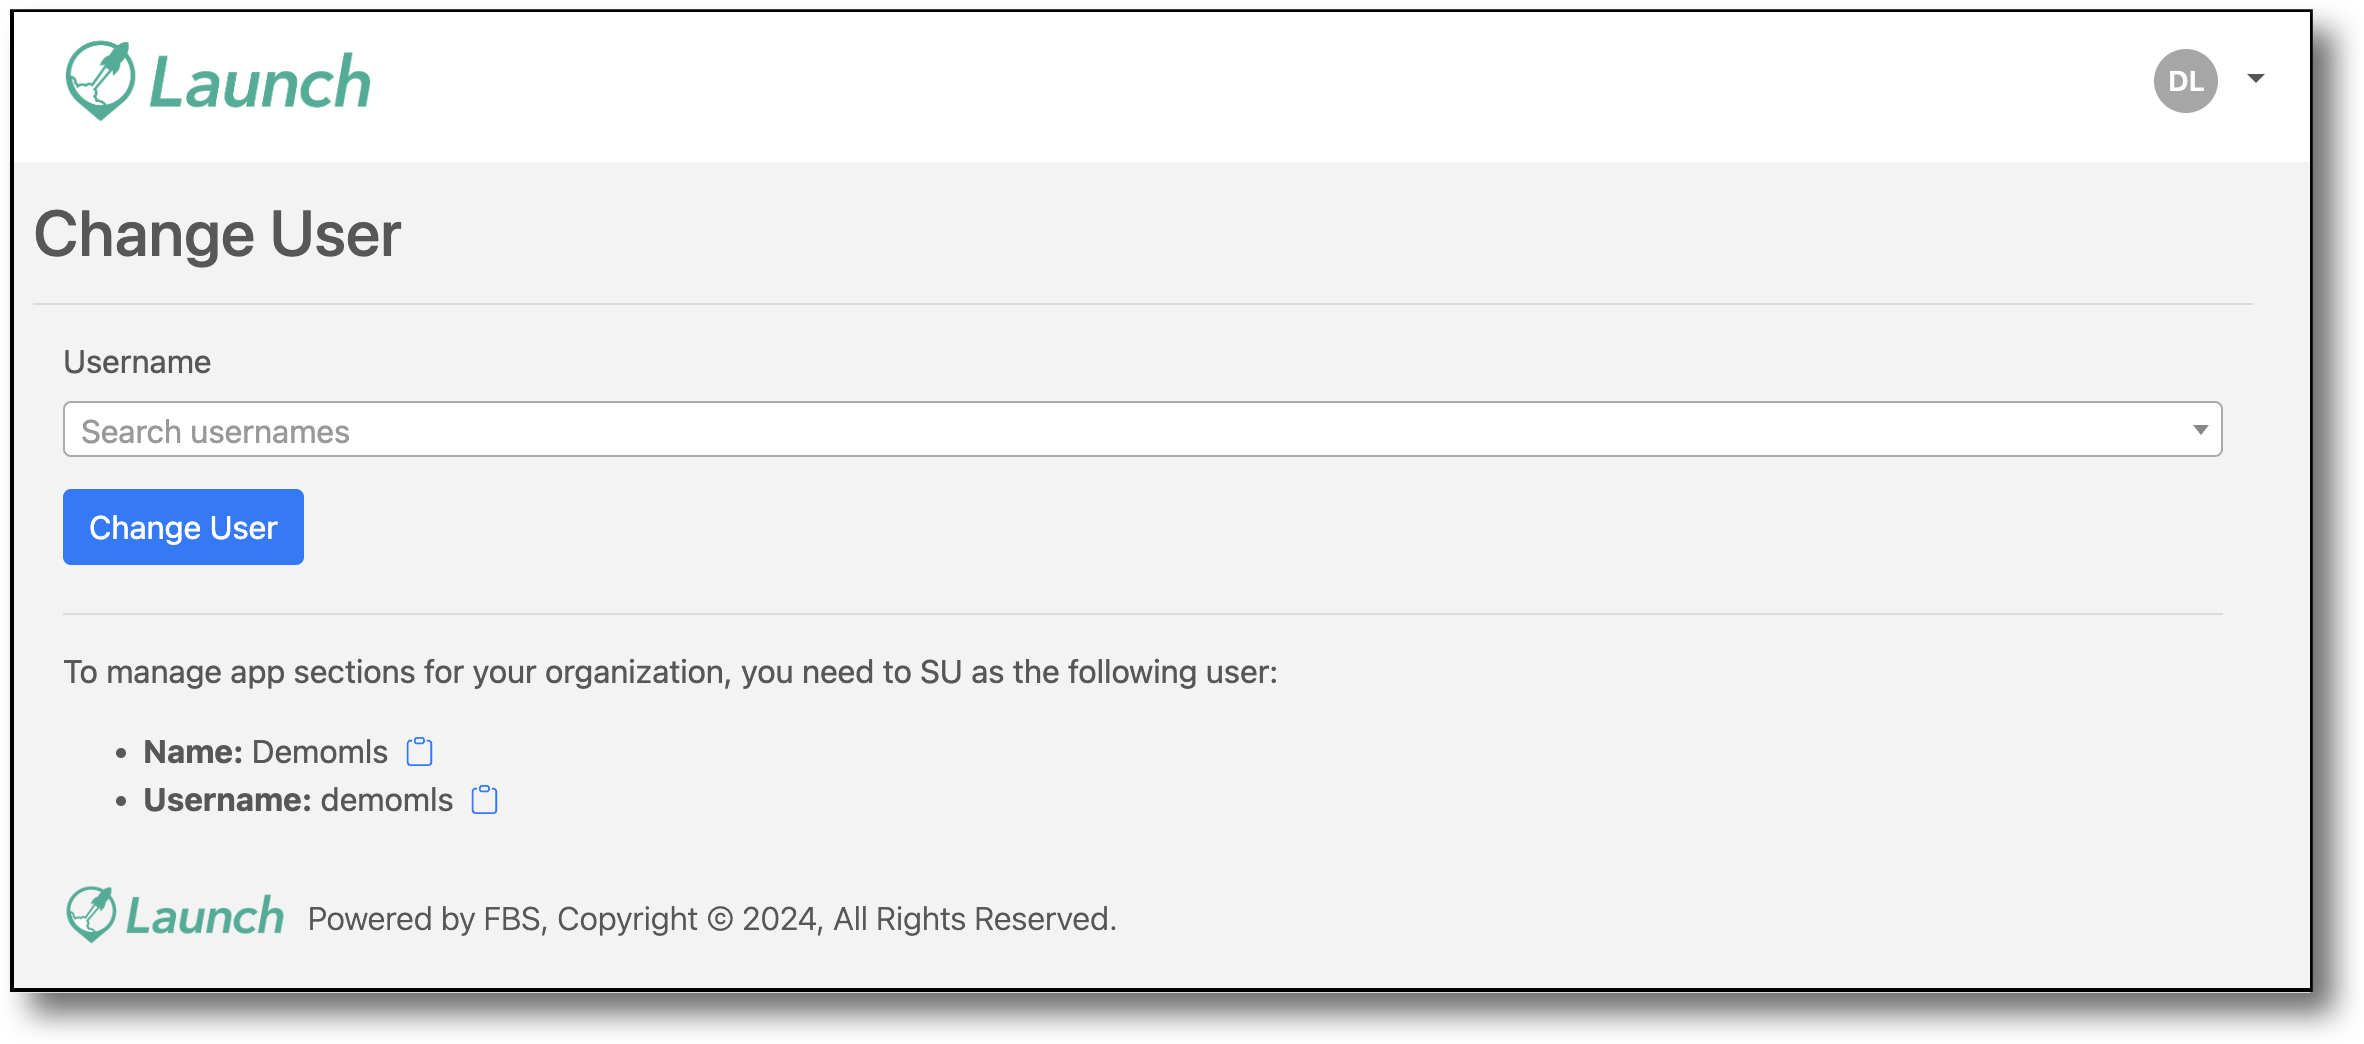
In the Change User page, refer to the superuser information listed under the Change User button. These instructions provide superuser login information for the root account of your MLS/Association. Enter the login information provided, and click Change User.
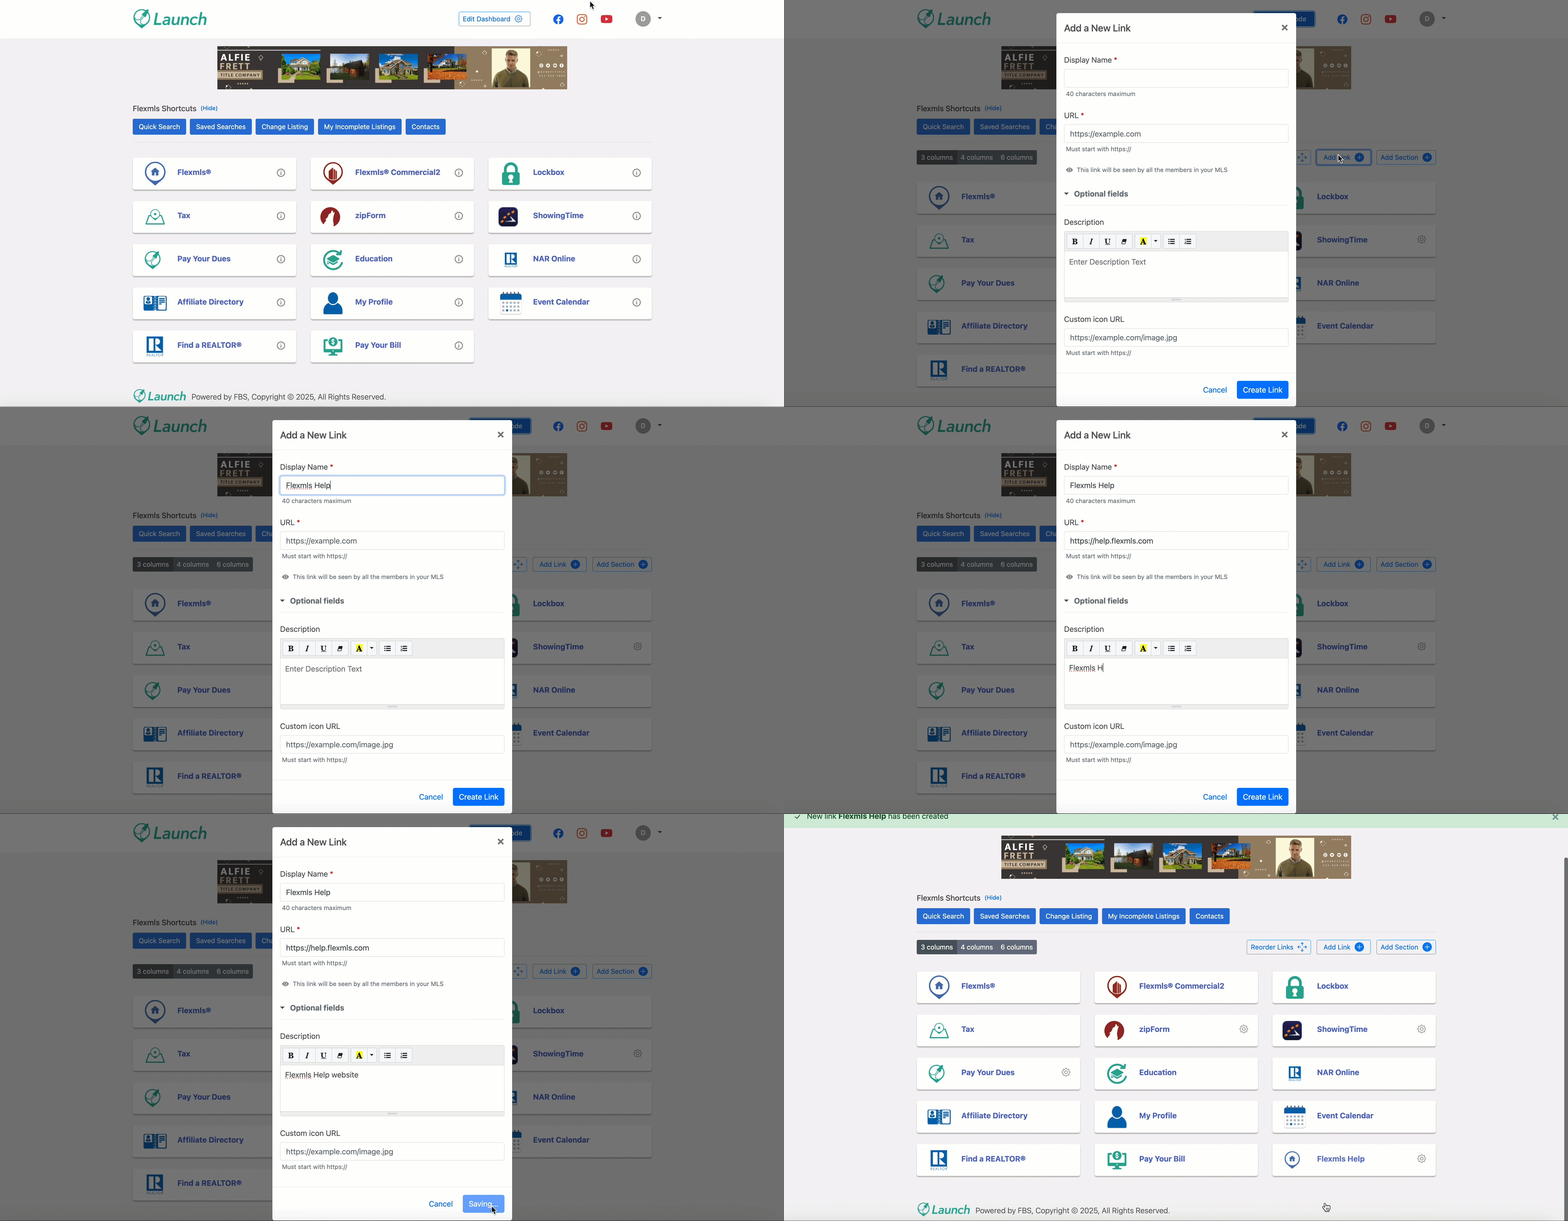
To create a custom link, click Edit Dashboard and then click Add Link. This brings up a pop-up window where you can enter the name you want your link to display as, the URL, a description, and a custom icon URL. When you are finished entering the information for your custom link, click Create Link. Your new link will appear in the custom section you have created.
Note
If you do not upload a custom icon URL, the link’s favicon (favorite icon) will automatically display. If there is no favicon available, the custom link icon will default to the Launch logo.
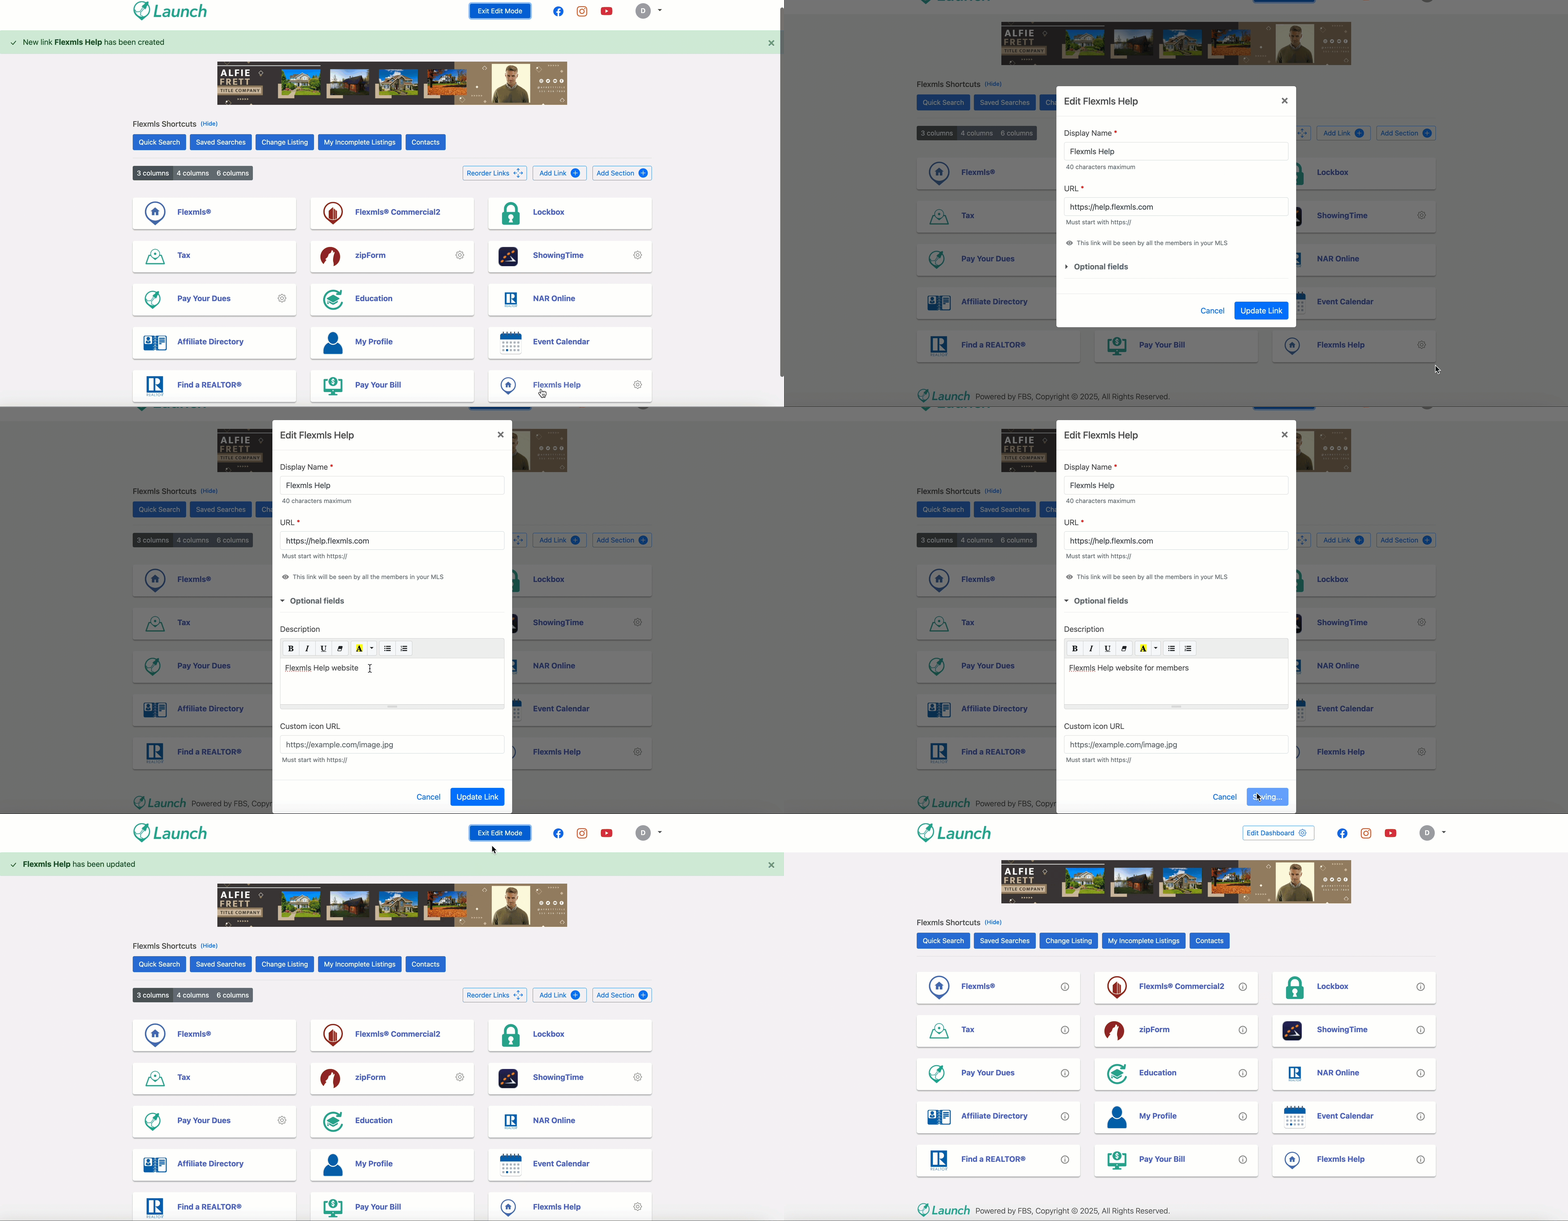
To edit or delete a link, click the gear icon on the link you want to edit. In the dropdown menu, select from either Edit Link or Delete Link. If you choose to delete a link, you will be prompted with a pop-up message notifying you that the link will be deleted. If you choose to edit a link, you will be prompted with the same pop-up window that appears when you first add a custom link. Here, you can update the information in any of the fields. When you are finished editing the link, click Update Link to save your changes. Click Exit Edit Mode when you are finished making edits to your dashboard.
You can track engagement metrics for custom links in your activity reports. These reports provide insight on member interactions, which can help admins optimize their dashboard content.
You can choose to replace social media links with icons for Facebook, YouTube, LinkedIn, Instagram, and X. These icons display in the header on desktop or in the footer on mobile. To replace social media links with icons, admins can submit a request directly to Chris Evenson (cevenson@fbstata.com) for implementation.
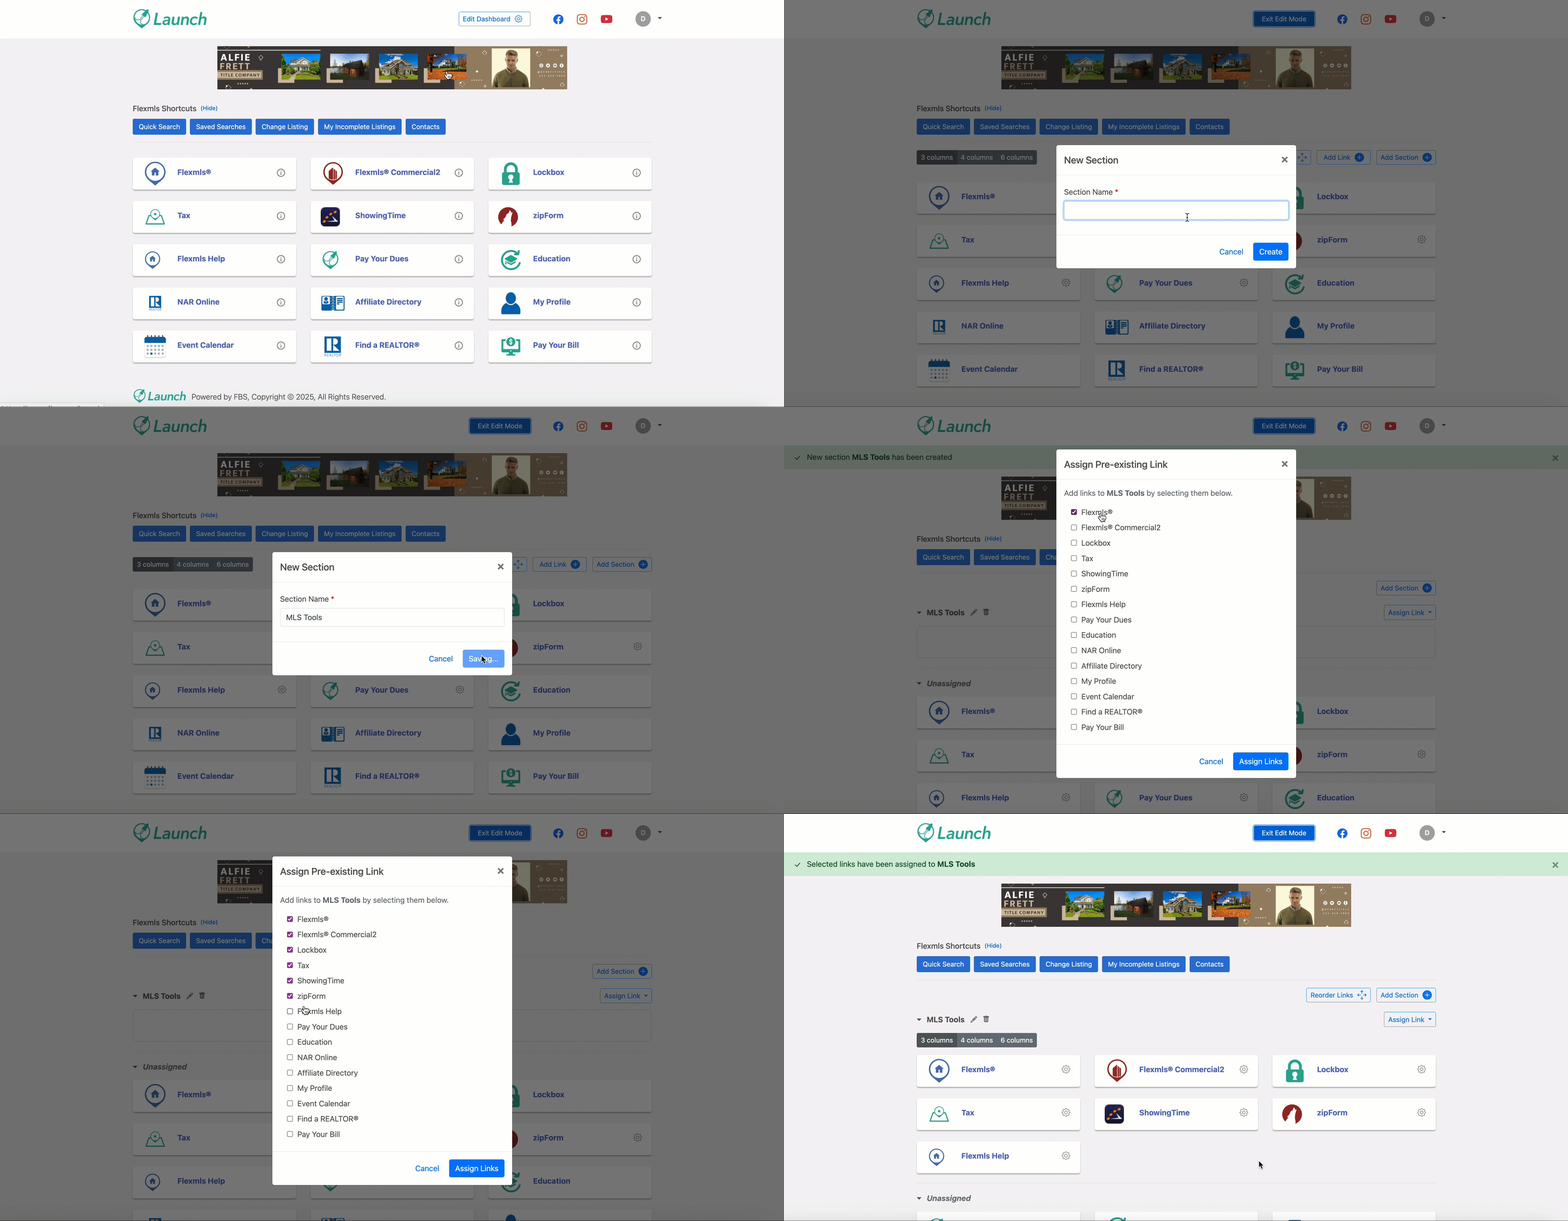
On the dashboard, click Add Section. Type in a name for the section, and click Create. A banner notification at the top of the page confirms that you have created a section. Once your section is created and named, you can begin adding links to that section.
To add links to your custom section, click Edit Sections. Then, click Assign Link to select which links you would like to display in that section. In the dropdown menu, select from either Existing Link or New Link.
To add an existing link to your custom section, click Existing Link. This brings up a pop-up window where you can select the checkboxes next to each link that you want to assign to your section. When you are finished selecting links, click Assign Links.
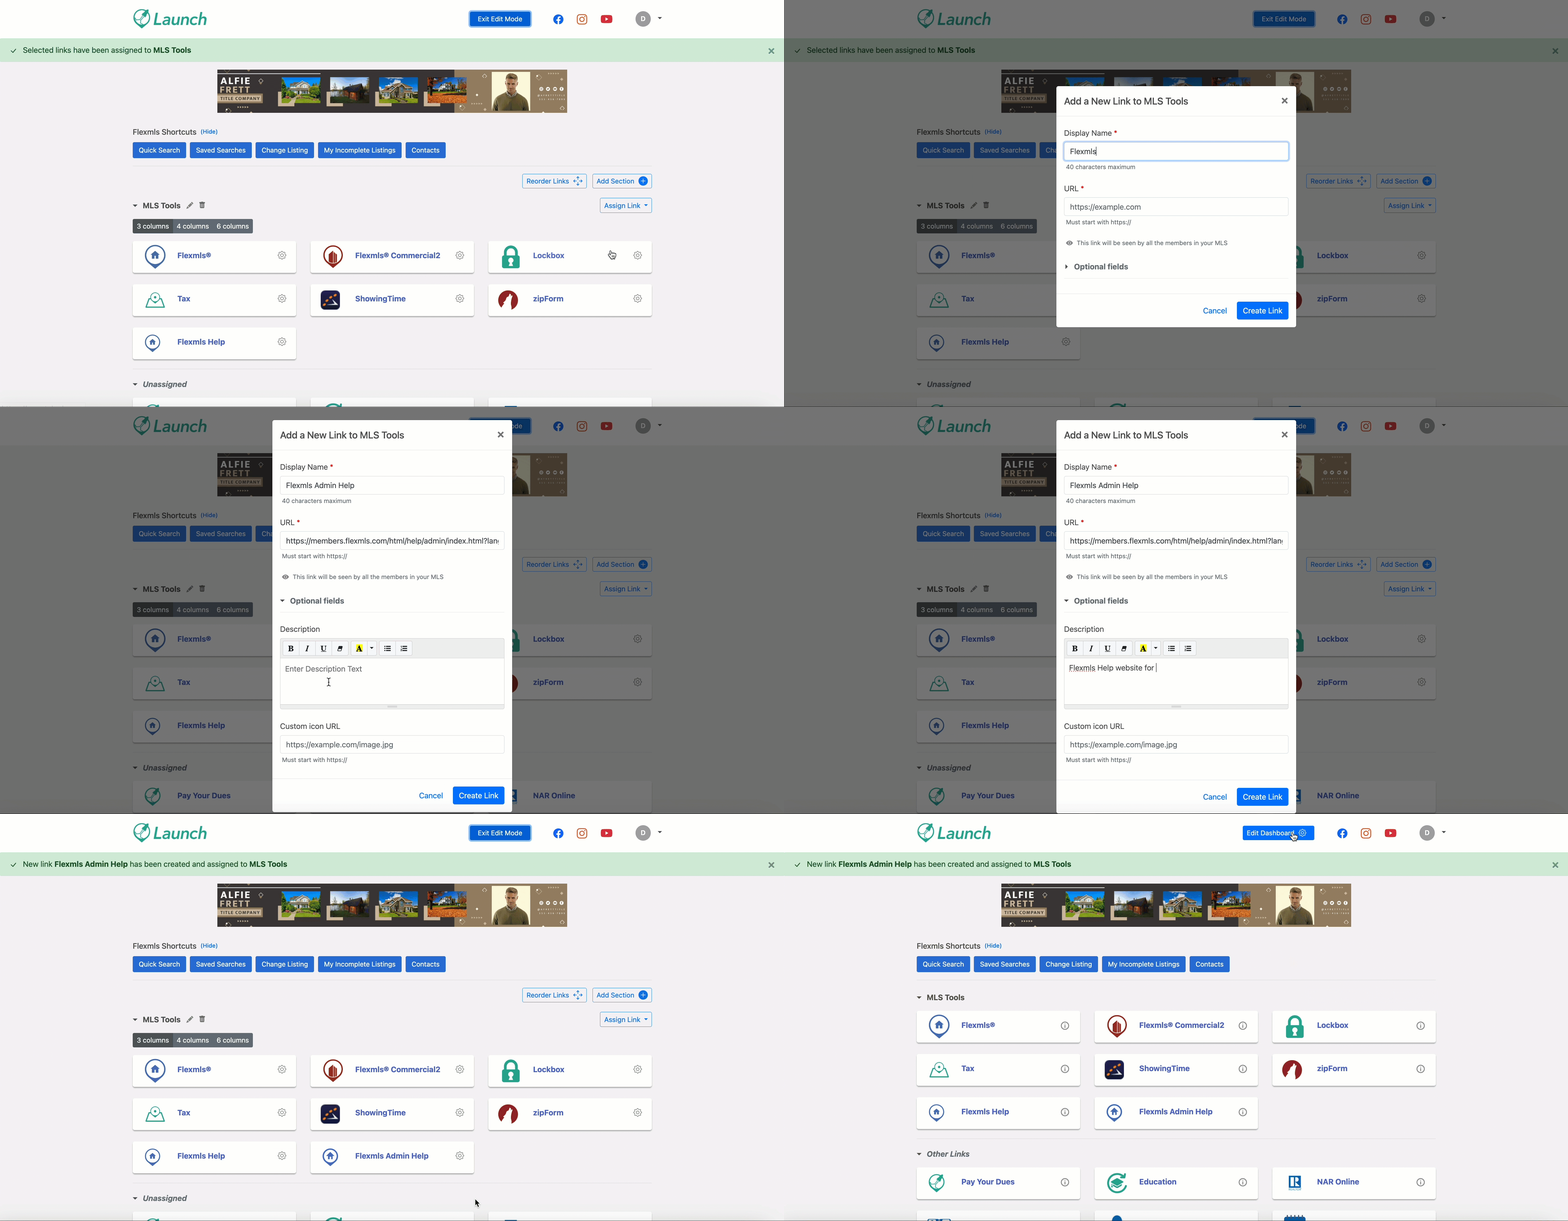
To create and add a new link to your custom section, click New Link. Enter your link information, including the name you want your link to display as, the URL, a description, and a custom icon URL. When you are finished entering the information for your custom link, click Create Link. Your new link will appear in the custom section you have created.
Note
Any links that are not assigned to a custom section are automatically sorted into a section called Unassigned (when in Edit Mode). When in View Mode or in member and admin accounts, this section is called Other Links. When you add a section for the first time, all your existing links in the Launch dashboard are in this section by default, until you assign them to a custom section. Members or admins cannot reorder the links in the Unassigned section. When you add links to the custom section you create, those links will automatically be removed from the Unassigned section.
To add another custom section, click Add Section and repeat the process described above. When you are finished creating your custom sections, click Exit Edit Mode.
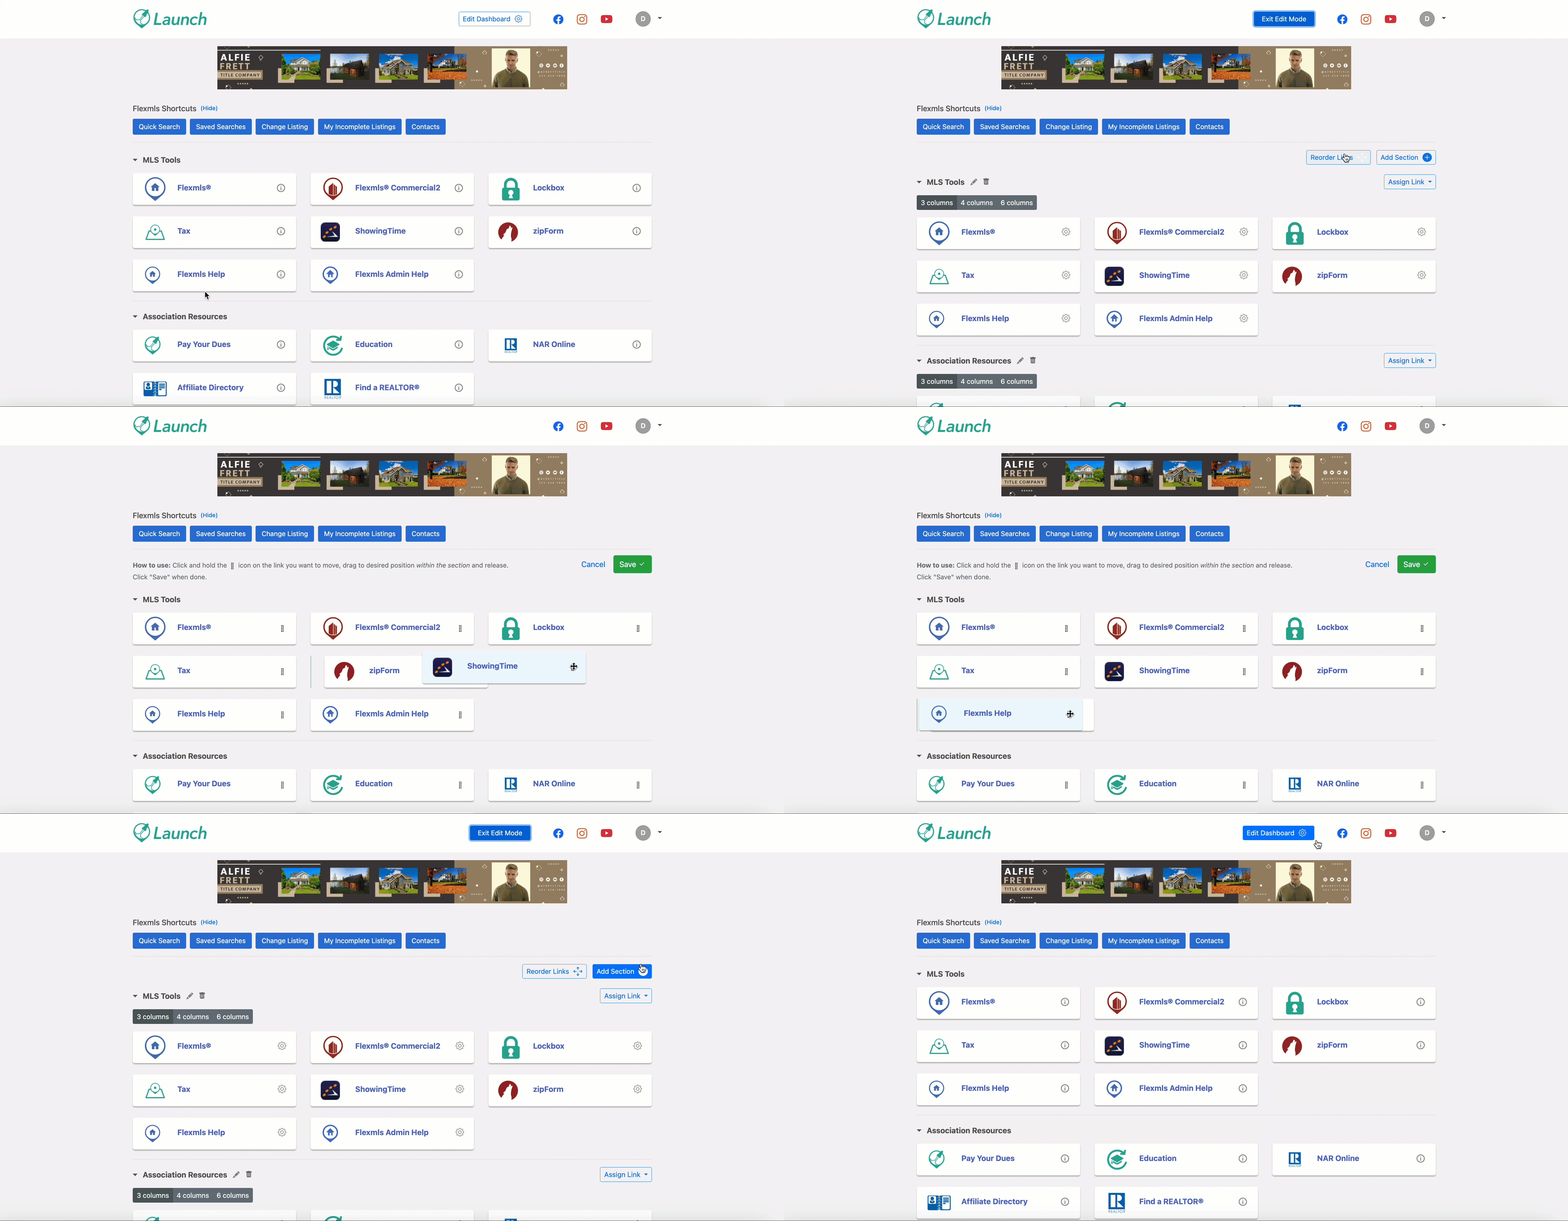
To reorder the links in a custom section, first make sure you are in Edit mode (click Edit Dashboard to enter Edit Mode). Once in Edit Mode, click Reorder Links. Click the drag handle to drag and drop the links and organize them in the order that you want. Once you have organized the links, click Save.
Note
You can only reorder links within a section. You cannot drag and drop links from one section to another. If you want to move a link tile from one section to another, delete the link from the original section by clicking the X button on the link tile. To add the link back to the section you want, click Add Link, and select the checkbox next to the link you want.
To make edits to a section after it has been created, click Edit Dashboard. Click the edit icon next to the section name to make changes to it. Click the X icon to delete the section entirely. Note that if you delete a custom section, all links that were previously displayed in that section will go back to the Unassigned section.
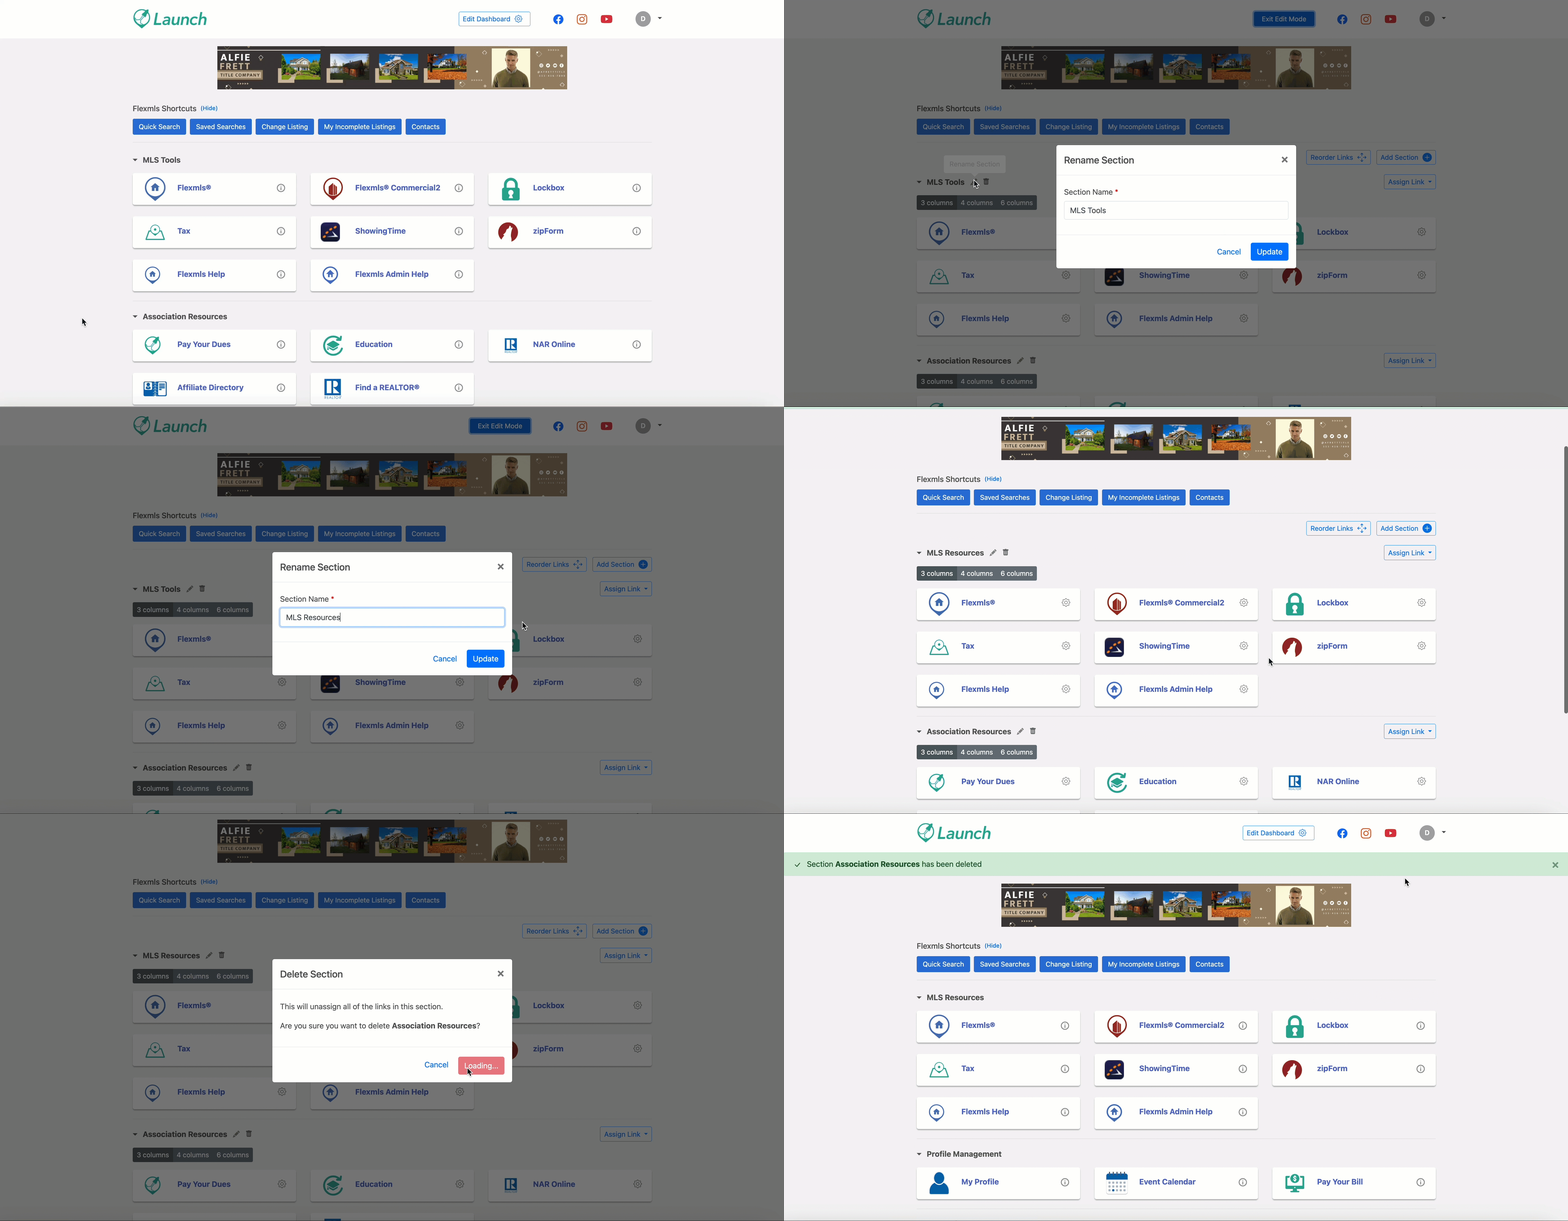
Note
If you create custom sections for your links on the Launch dashboard, the Reorder Links button will no longer be visible on admin and member accounts, and admins and members will no longer be able to change the order of their links on their dashboards from their accounts.
Customize Link Display
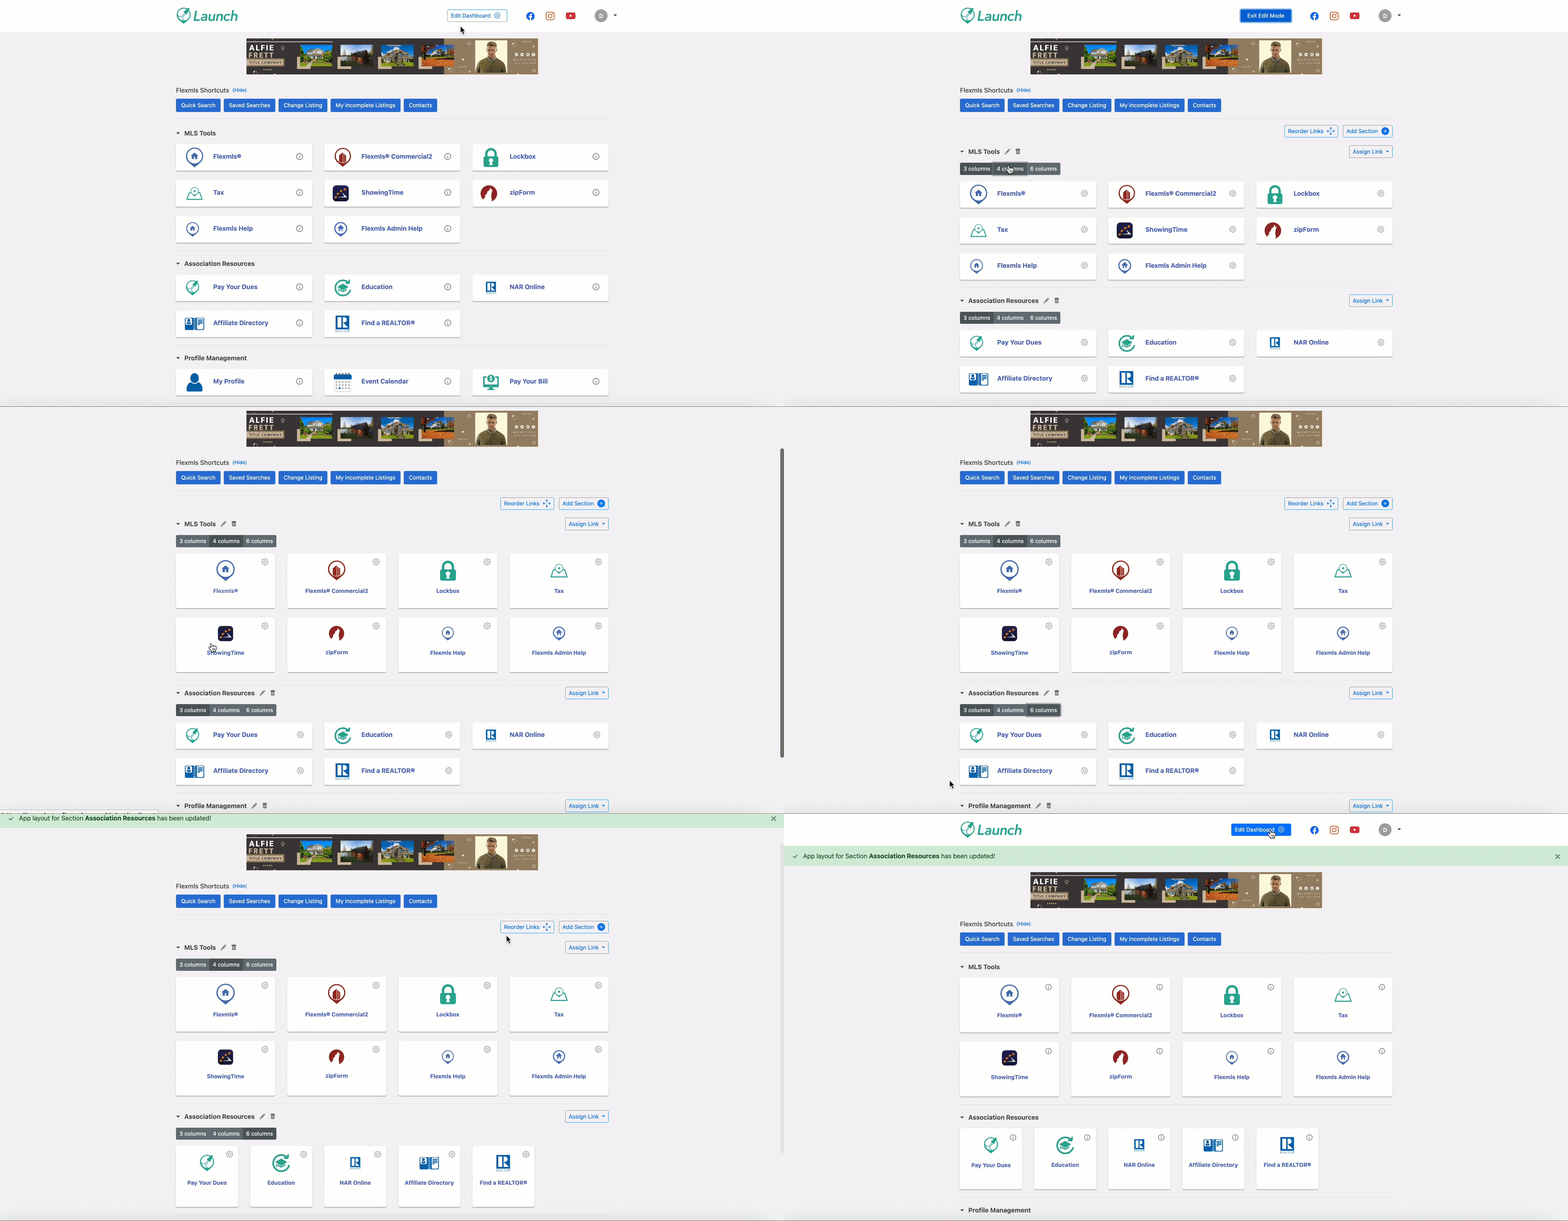
You can customize the way you want your links to display in your dashboard. To start, click Edit Dashboard to go into Edit Mode. Once in Edit Mode, you can choose to display your links in columns of 3, 4, or 6 by selecting the corresponding button. The size and position of the links automatically adjust depending on the column number you choose.
If you have custom sections for your links, you can also choose to display your links differently for each section. For example, you can display your links in columns of 4 for one section, and columns of 6 for another section. Or, you can display your links the same way across sections.
What Members and Admins See
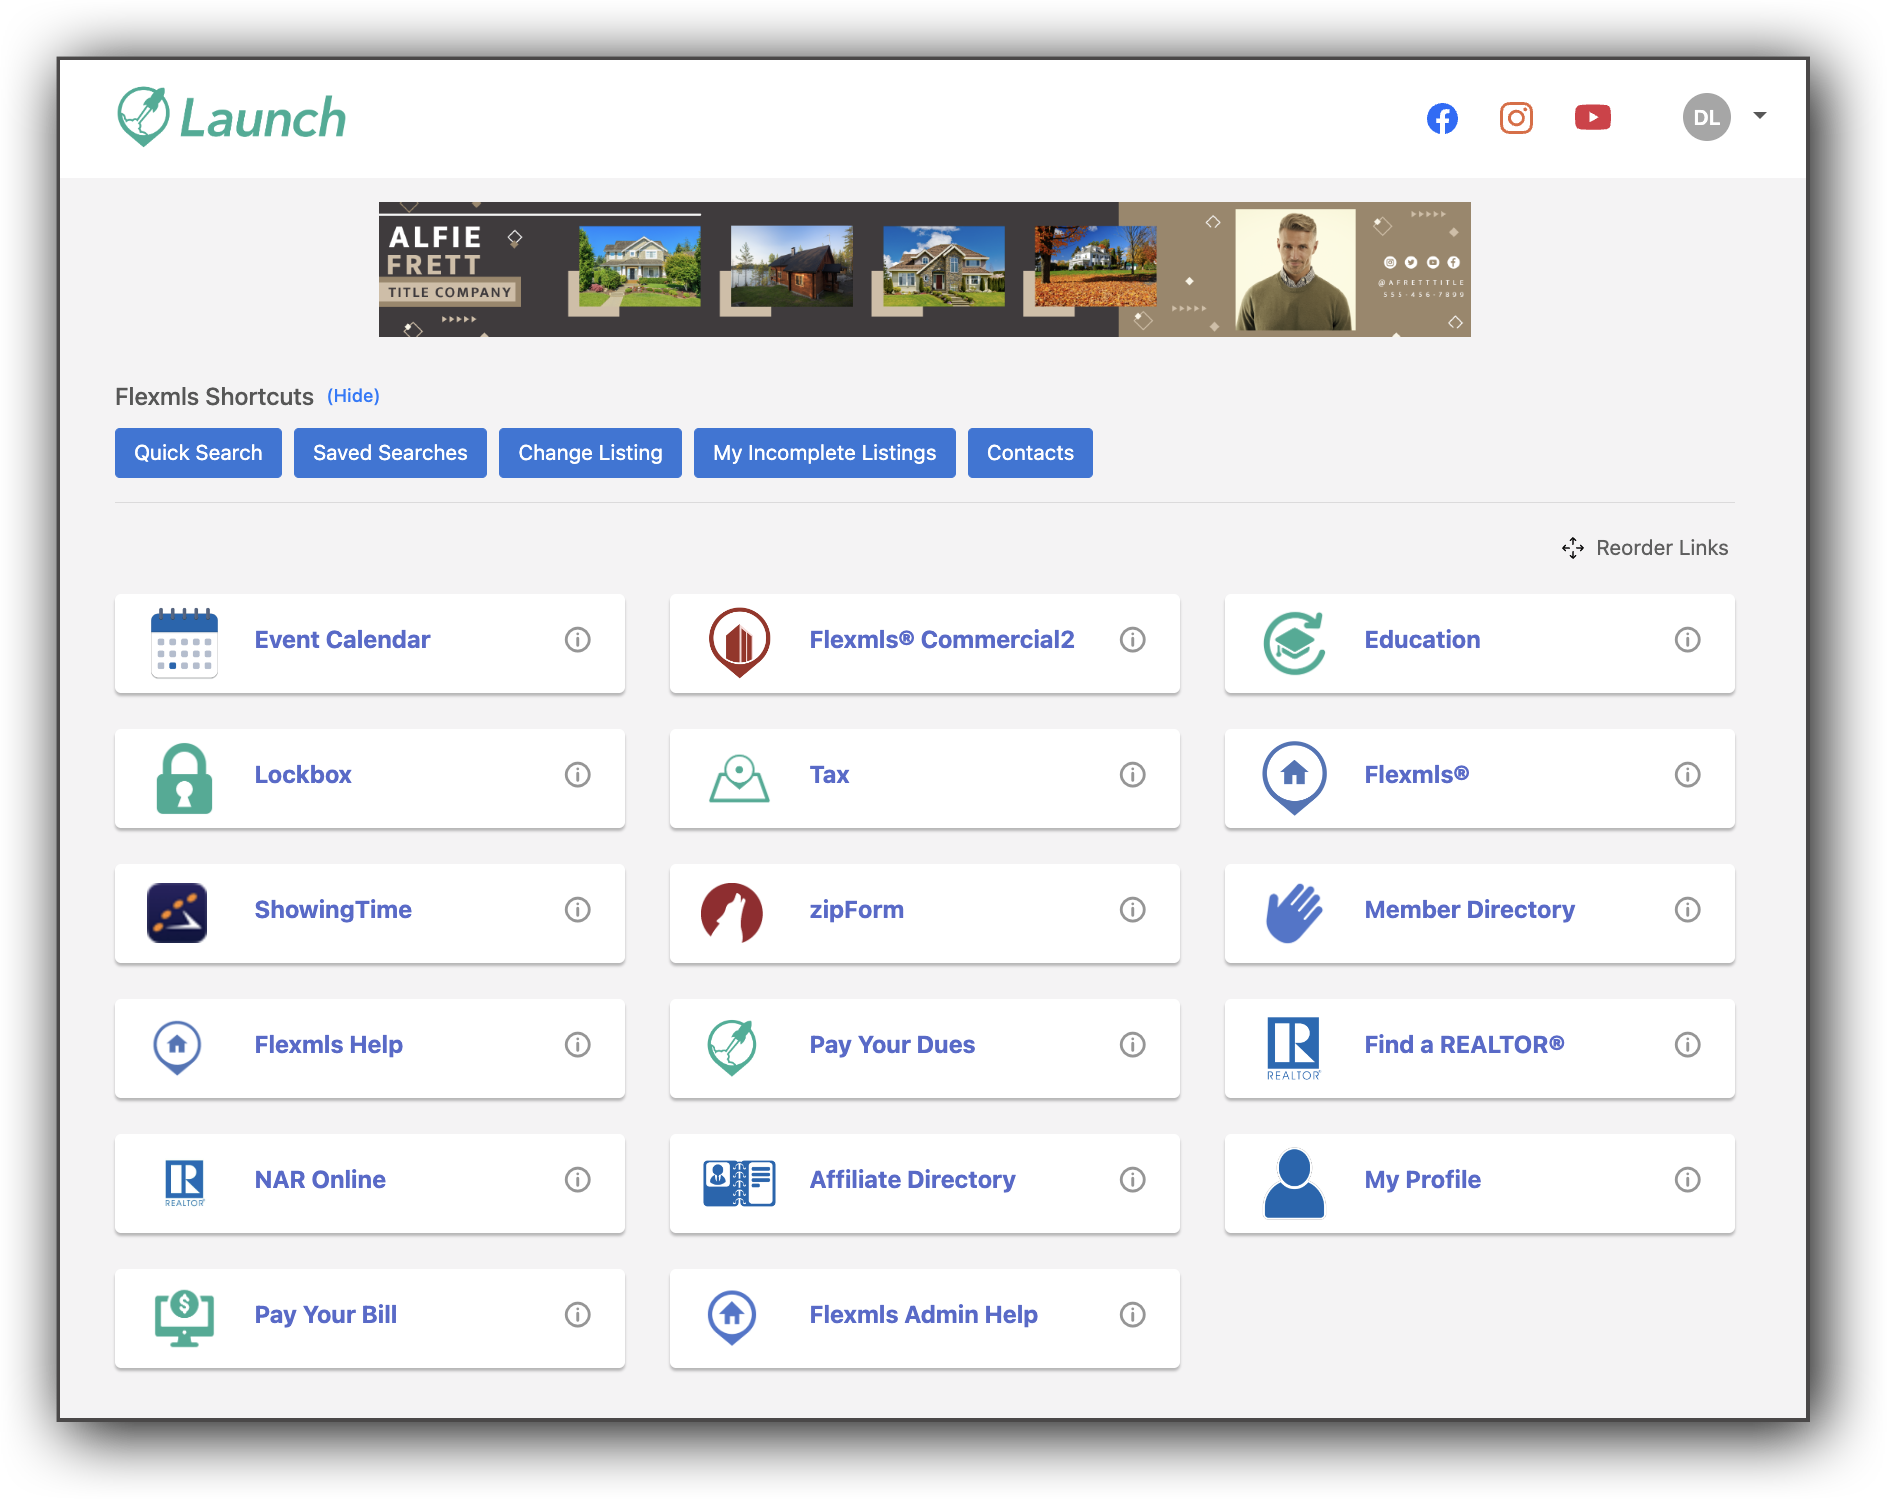
Refer to the images below for what admins and members will see on their dashboards.
What admins see:
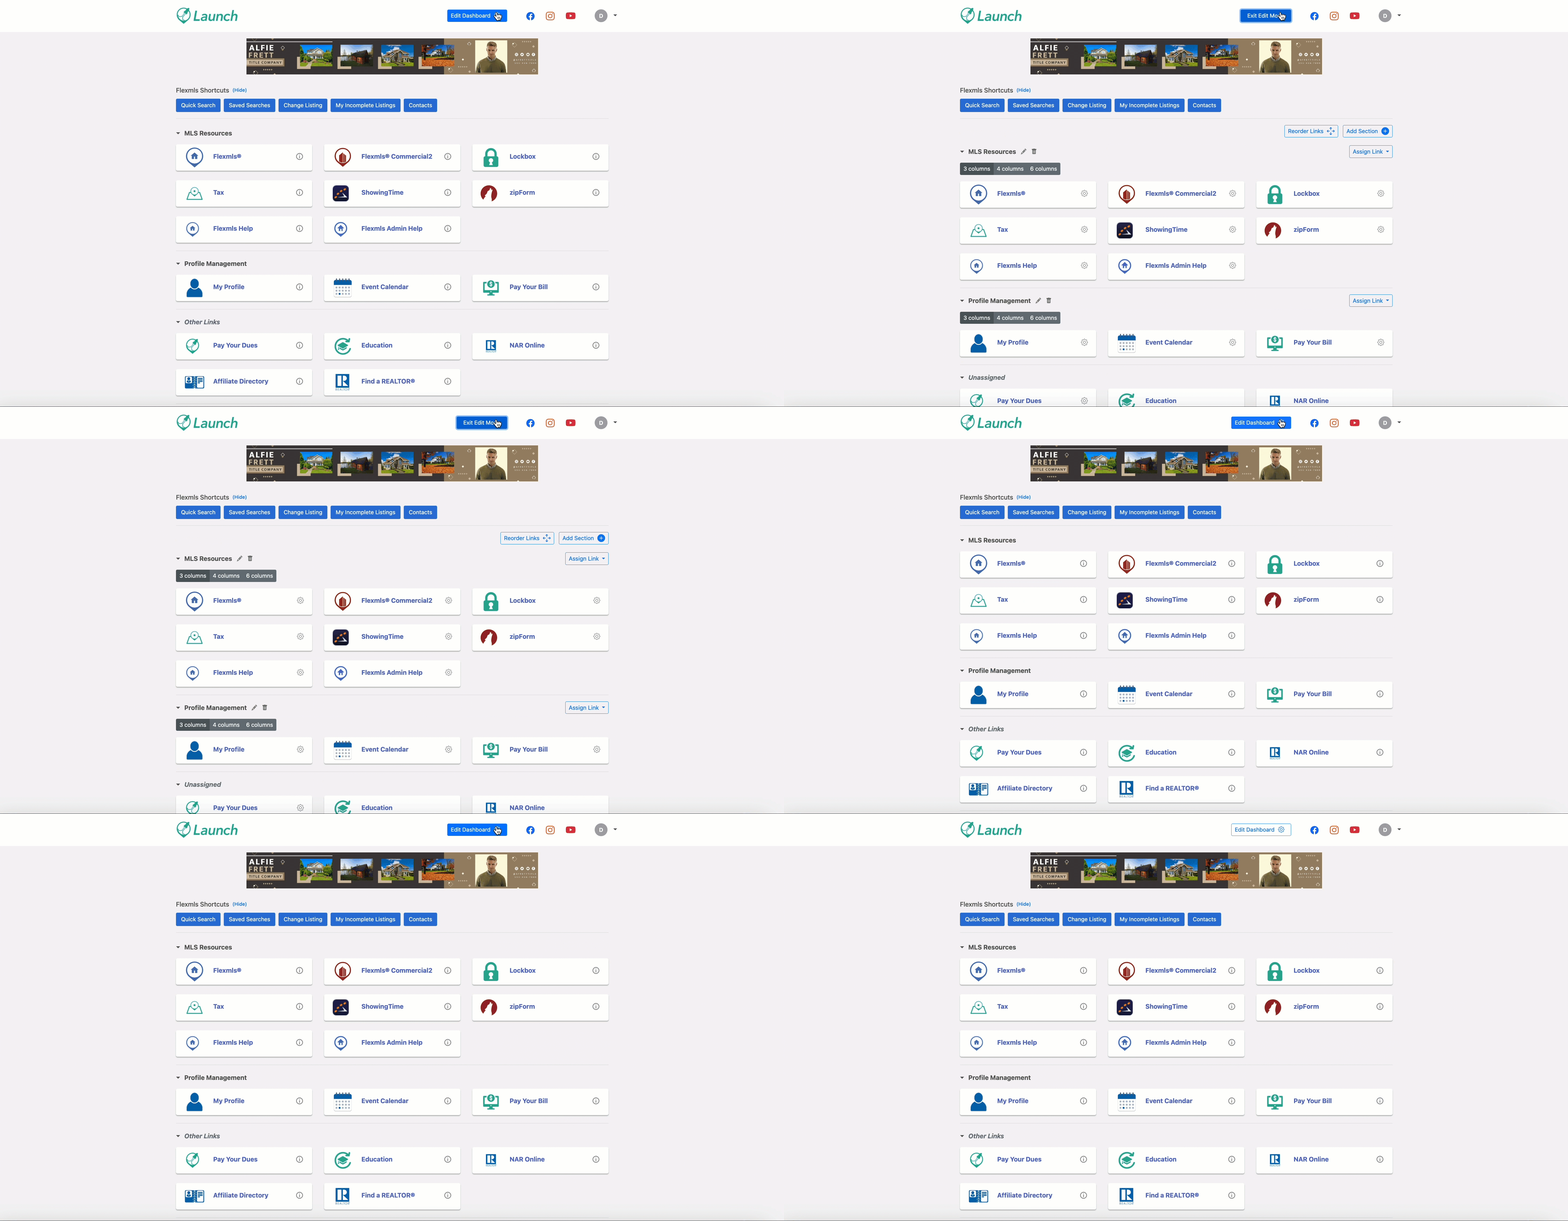
What members see (if custom sections have been created):
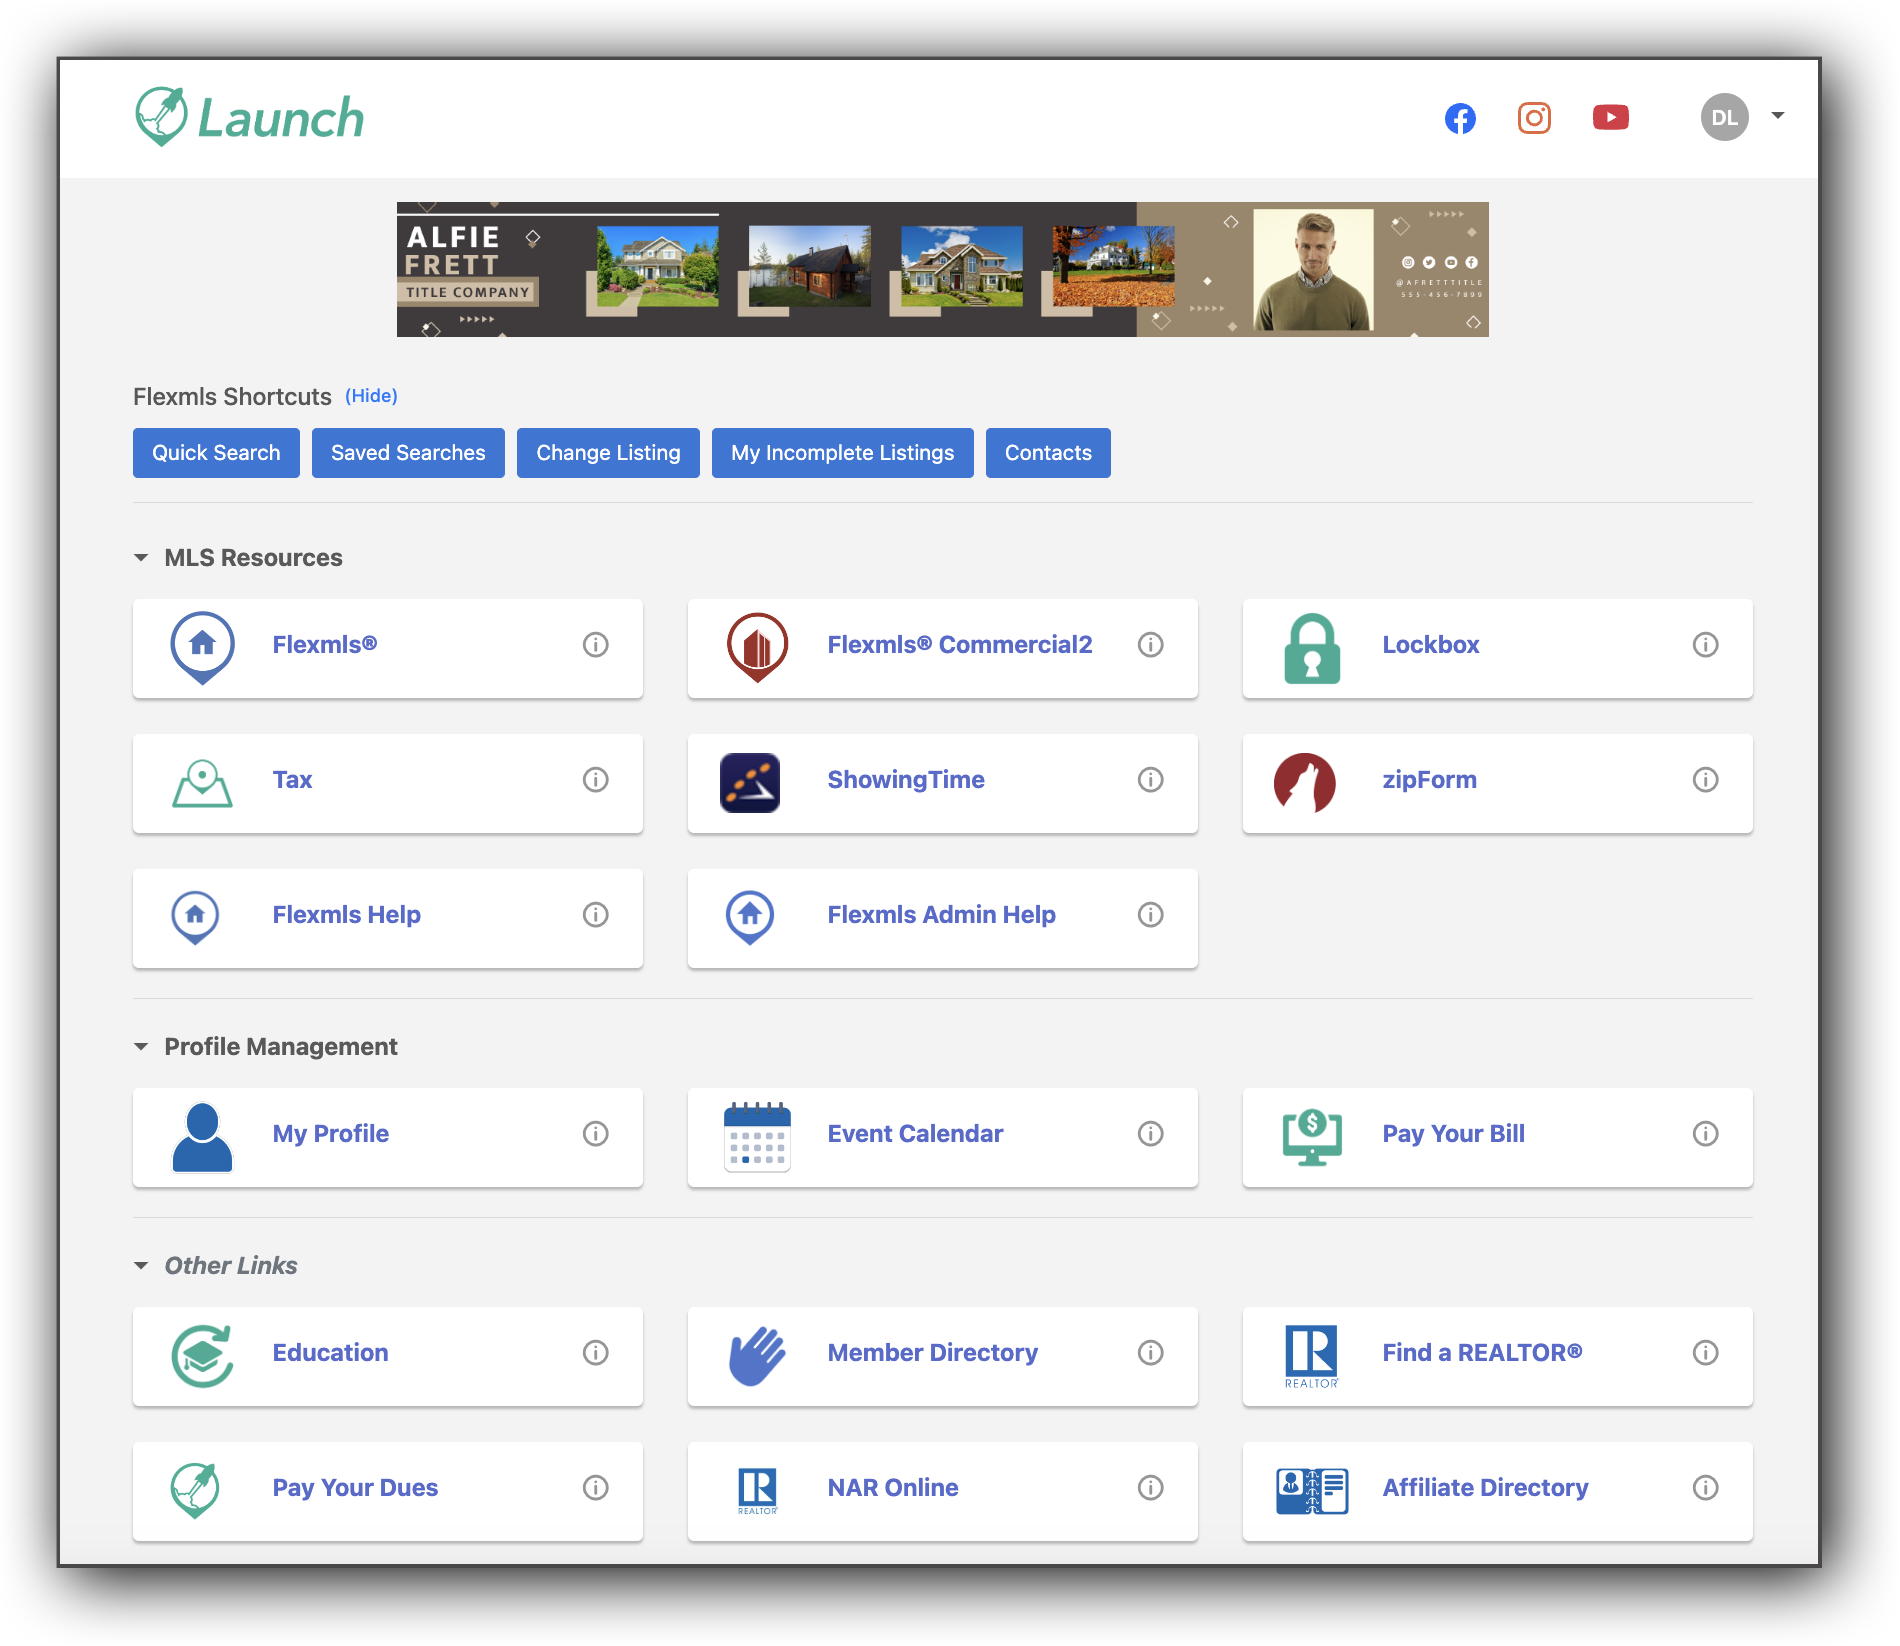
What members see (if custom sections have not been created):
Note
Note that the Reorder Links button is not visible for members if you have created custom sections for your links on the Launch dashboard. The Reorder Links button remains visible if you have not created custom sections.