Member Types
Click Member Types under Users on the Admin menu to create or modify member types. Member types can be used to categorize MLS members into groups or by their titles. Some features of Flexmls, such as the office/member roster, allow you to search for or display users based on member type.

Add a Member Type
To create a new member type, click Add new user type.
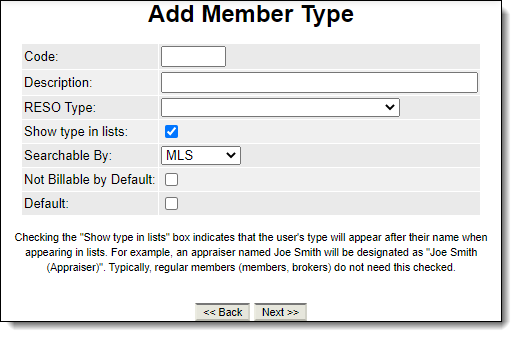
Enter the following information:
Code - A unique alphanumeric short code for the member type.
Description - Long name of the member type. The description is shown when you search for a member type or assign a member type to a user.
RESO Type - Select the corresponding RESO member type. Mapping your member types to RESO types makes the data accessible via the Spark API and provides better consistency of member data across MLS systems.
Note
Do not map more than one member type to a RESO Type. If multiple member types could potentially be mapped to the same RESO Type, we recommend that you map the best match only. Then either remove the others or set their RESO Type to None.
Show type in lists - Show the user's member type after their name in lists. For example, an appraiser named Joe Smith would be listed as "Joe Smith (Appraiser)". Typically, it is not necessary to select this option for members or brokers.
Searchable By - Select the users who can filter user lists by this member type. By default MLS is selected, which means only MLS administrators can filter by this member type. Select Members to allow MLS members and MLS administrators to filter by this member type. Select Public to allow filtering by this member type on IDX roster links. If you select Public, members and MLS administrators can also filter by this member type.
Not Billable by Default - New users with this member type should be marked as not billable by default.
Default - The member type should be the default when adding new users
Click Next to save your entries. Click Next again to confirm.
Edit or Remove a Member Type
To make changes to a member type, modify the information displayed on the Edit Member Types page, then click Update. To remove a member type, click the check box in the Remove column and click Update.
Note
If you would like to customize onboarding email templates based on member type, go to Menu > Admin > Users > Member Types to associate a specific email template to a specific member type. In the Onboarding column, select the email template that you want to associate with that member type. The custom or default email template will be used to send password onboarding emails when a new user is created.