Portal Preferences
To set up your default portal and subscription preferences, click Portal Preferences under Preferences on the menu. You can customize your portal by modifying the fields under any of the portal preferences. If you make changes to these preferences, be sure to click Save at the bottom of the page.
Note
This section describes the preferences for the Flexmls Portal. Where available, you may have access to the classic portal. For information about preferences for the classic portal, see Classic Portal Preferences.
To change portal settings for an individual contact, see Portal Tab (Contacts).
Option | Description |
|---|---|
Intro | Watch a video for a brief overview of how the Flexmls Portal helps you collaborate with your clients. |
Portal Basics | Enter a name for your portal. The portal name is displayed in the web address that your clients use to access the portal. The portal URL is also listed. Even though all your clients use the same portal URL, each client logs in with a unique username and password. In the dropdown menu, you can select the search template for portals of agents who do not have Flexmls IDX. Clients see only the searches and subscriptions that you have saved to their contact record in Flexmls. Enable your portal using the toggle next to the Portal Enabled field. When your portal is enabled, you can invite any of your contacts to use it. |
Profile Card | This preference allows you to customize the contact information that displays in your portal. You can also upload a logo or photo to display on your portal. Enable the Sync from profile setting to sync your contact details from your current Flexmls profile. When this setting is enabled, the fields to enter separate contact information are grayed out. If you make updates to your profile (either Flexmls My Profile or your MLS's member management system), enabling this setting will sync to your portal. You can disable the Sync from profile setting to enter new contact details, separate from your Flexmls profile, to display on your portal (as allowed by your MLS). |
Featured Listings | This setting allows you to choose which listings display on your portal. You can choose to display your listings, your office listings, or listings from a saved search. |
IDX Lead Generation | If you are not a Flexmls IDX subscriber, you can watch a quick video to learn more. If you are a Flexmls IDX subscriber, you can create featured searches for your market. By default, this setting is On. You can also select which fields are required for users when they sign up for a portal. By default, a name and email address are required for all portal users. Using the toggles, indicate whether a physical address and phone number are also required. Select the email address that will receive leads generated through your portal. The default selection is your primary email address. Use the drop-down menu to select an alternate email address from your profile. |
Intro Email | Select whether the Send Invite checkbox on the Portal tab of Contact Management is checked by default. Set up a default email subject line and introductory message for portal invitation emails. A default message is provided, or you can type your own message. You can also customize messages individually before they are sent. |
News Feed | Select which statuses are displayed in the news feed for portals and subscriptions. The news feed contains the listings your contact has received via subscription emails. If Show in Portal is set to On, listings with that status will display in the news feed, even when the listing's status no longer matches the status that was defined in the original search. Listings in the news feed will always display the listing's current status. 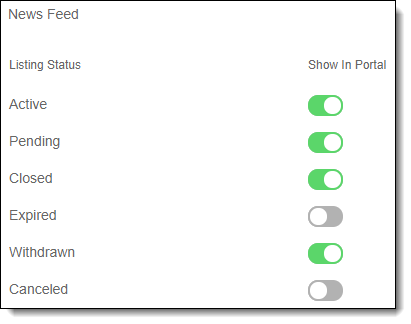 |
Default Subscription Settings | Select the listing changes that will trigger a subscription to automatically send listings to your contacts. Click the Use Inherited Defaults button to use the default settings as determined by the MLS. |
Listing Content Options | Choose which content appears by default for your contacts when they view listings in the portal and subscription emails. These options may vary by MLS.  |
Emailed Listing Links | Select where your contacts will be directed when they click a link in a subscription email. 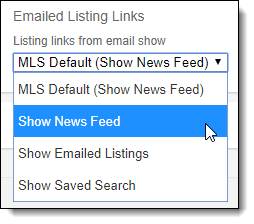 You can use the default set by your MLS or select one of the following options:
|
Other | If the Switch to Classic Portals button is available, you can revert the format of your portal and emailed listings to the Classic tabbed version. This setting affects all portals and listing emails. |
Tip
The following Guided Help tours are available for this function in Flexmls. When you click on a link, an instance of Flexmls will open in a new browser tab and instruction bubbles will guide you through the process.