Business Cards
In Flexmls, you have a default business card called "Generic Card" that contains the primary contact information from your profile. (For information about changing your profile information, see My Profile.)
To customize your business card or include information that is not part of your profile, you can use the Custom Report Editor. There are two methods for customizing a business card. You can type information directly into the report editor, or you can use tags to pull information from Flexmls. If you type your contact information into the report editor, the information will remain static. Use tags if you want the information to change automatically based on changes in your Flexmls profile.
Tip
The following Guided Help tours are available for this function in Flexmls. When you click on a link, an instance of Flexmls will open in a new browser tab and instruction bubbles will guide you through the process.
Create a Basic Business Card
To start building a custom business card, click My Reports under Preferences on the menu.
Note
While you can create your business card using any supported browser, we recommend that you use Mozilla Firefox for best results.
At the bottom of the Custom Reports page, click the New button.
Select the Business Card option. The Custom Report Editor will open.
Click in the Card field at the top of the report editor and type a name for your business card. The name you enter will be visible only to you; it will not be visible to other users or your clients.
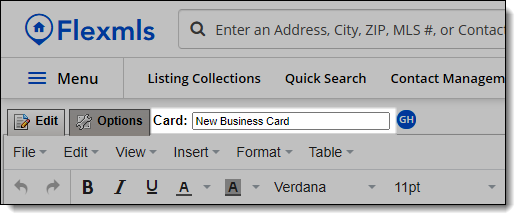
Click in the editing pane to place the first item. Enter and format the information just as you would in any other text editor (such as Microsoft Word). For more information about specific options, see Custom Report Editor.
When creating a business card, you can click Preview in the top right corner of the page to see what your business card will look like in its final form. The preview opens in a new window, so you can click the X icon to close the preview without losing work.
To save the business card, click Save in the top right corner of the report editor.
To have better control over the placement of profile information in your business card, we recommend that you start by creating a table. For example, you can use a table to display a photo on one half of the card and display contact information on the other half.
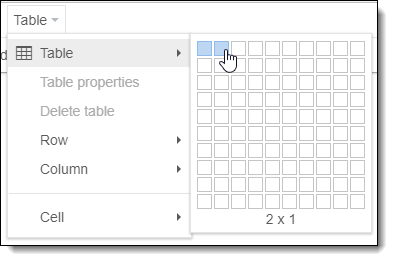
To create a table, select the Table menu and hover over the Table option to open the grid.
Hover over the squares in the grid to specify the number of rows and columns in the table. When the correct table layout is highlighted, click in the grid to place the table. For a business card, you will likely want to highlight the first two squares.
To create a border around the table, click the Table menu and choose Table properties. In the window that opens, click in the Border field and type the width of the border that you want to add. Click OK to apply the change.
Note
The border will not appear until you save or preview the business card.
To change the alignment of the information in a cell or to specify cell width, click in the cell and then click on the Table menu. From the Cell sub-menu, choose Cell properties. Click OK to save your changes.
To ensure that the contact information in your business card matches the contact information you have entered in your Flexmls profile, use profile tags in your business card.
The Profile pane at the right side of the report editor lists the available profile tags. Some categories contain a Primary option that uses the profile data that is marked as primary in your profile.
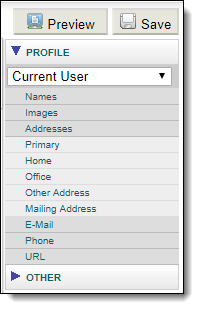
To get started, click the Names category and then choose Preferred Name. The Preferred Name profile tag will be added to the business card.
Note
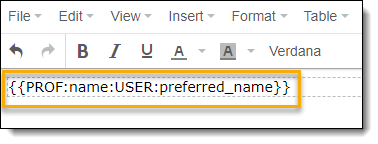
The Preferred Name profile tag shows either the Public View Name or Private View Name from your profile, depending on where the business card is being displayed.
The report editor shows the tag information, but when you use the business card it will automatically show the name you have specified in your profile.
Press the Enter key to move to the next line in the editor.
Continue adding tags by clicking on categories and choosing profile data.
There are multiple methods for adding images to a custom business card. We recommend using profile tags, but there may be cases where one of the other methods is more appropriate.
Use Profile Tags
If you use a Photo or Logo profile tag to add an image, the image in your business card will be updated when the image in your Flexmls profile is updated. The following procedure assumes that you are using a table to organize the information in your business card.
In the report editor, click inside the table cell where you want to add the image.
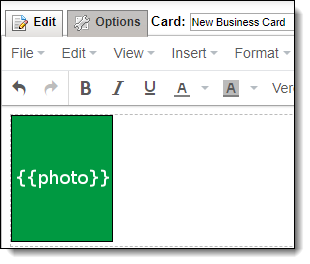
In the right panel of the editor, click Images and then click Photo to insert a photo or click Logo to insert a logo. Like other profile tags, a placeholder (a green rectangle) is displayed in the report editor instead of the actual image.
To change the properties of an image, right-click on the placeholder and click Image. Use the options in the pop-up window to specify image size, border, and more.
Use a Static Image
Click the My Photos button in the report editor to insert a photo or logo that you have uploaded to the Personal Photo and Logo Maintenance section of your profile. If you use the My Photos button to add an image, the business card uses a static copy of the selected image instead of a placeholder. If you change the image in your Flexmls profile, the image on your business card will not change automatically.
Use an Image from a Web Site
You can use images from an external web site, such as a personal web site, Facebook, or Twitter, in your business card. This method eliminates the step of uploading the image to Flexmls. However, this method assumes that the image is available on the internet. If the image becomes unavailable for any reason (web site goes down, is redesigned, or the image is removed), your Flexmls business card will be affected.
Navigate to the web page where the image is stored.
Right-click on the photo, then click Copy Image URL.
With your business card open in the report editor, click inside the table cell where you want to place the image. Click the Insert menu and select Image.
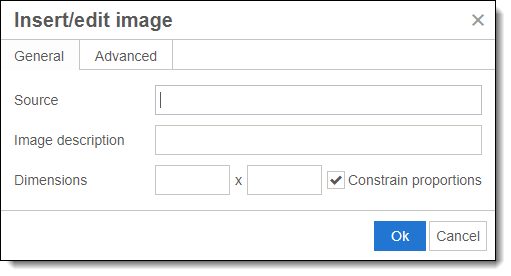
In the pop-up window, right-click in the Source field and click Paste to paste the image URL.
Click Ok to insert the image. The selected image will be displayed in the report editor.
Use hyperlinks to add clickable links to your business card in Flexmls.
In the report editor, type the text that you want to be clickable in the business card. For example, if your email address will be clickable, type your email address or other text such as "Email me".
Note
Depending on your web browser, when you type an email address or web site URL, the text may be formatted as a hyperlink automatically when you press Enter. Use the following steps if the hyperlink is not created automatically.
Use your mouse to highlight the text that you want to make into a hyperlink.
Click the Insert menu and select Link. The text that you highlighted will appear in the Text to display field. (Double-check that this is the text that you want to make clickable.)
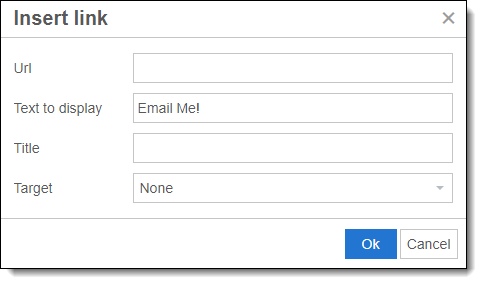
Enter a URL into the Url field.
To create a link that opens a new email message, type mailto: followed by the email address that you want the email to be sent to. For example, type mailto:me@example.com.
To create a link that opens a web site, type or paste the web site address.
Click Ok to create the link.
Your default business card will appear on listing reports and as a signature option when emailing listings from Flexmls. If you want to use your new card as the default, click General Preferences under Preferences on the menu. Go to the Choose a default business card option and select your newly created card. Be sure to click the Save button at the bottom of the page to save your changes.
If you are using the classic client portal, you can specify the default business card to use as the signature when sending portal emails. Click Portal Preferences under Preferences on the menu. In the Portal Signup Email and Invite sections, use the Business Card field to select your new business card. In the Portal Preferences section, select the business card that is used for branding on the portal. Be sure to click the Save button at the bottom of the page to save your changes.