Map Tab (Search Results)
When you are viewing search results, use the Map tab to view listings on a map, see a satellite view of an area, or define search shapes to modify the search.
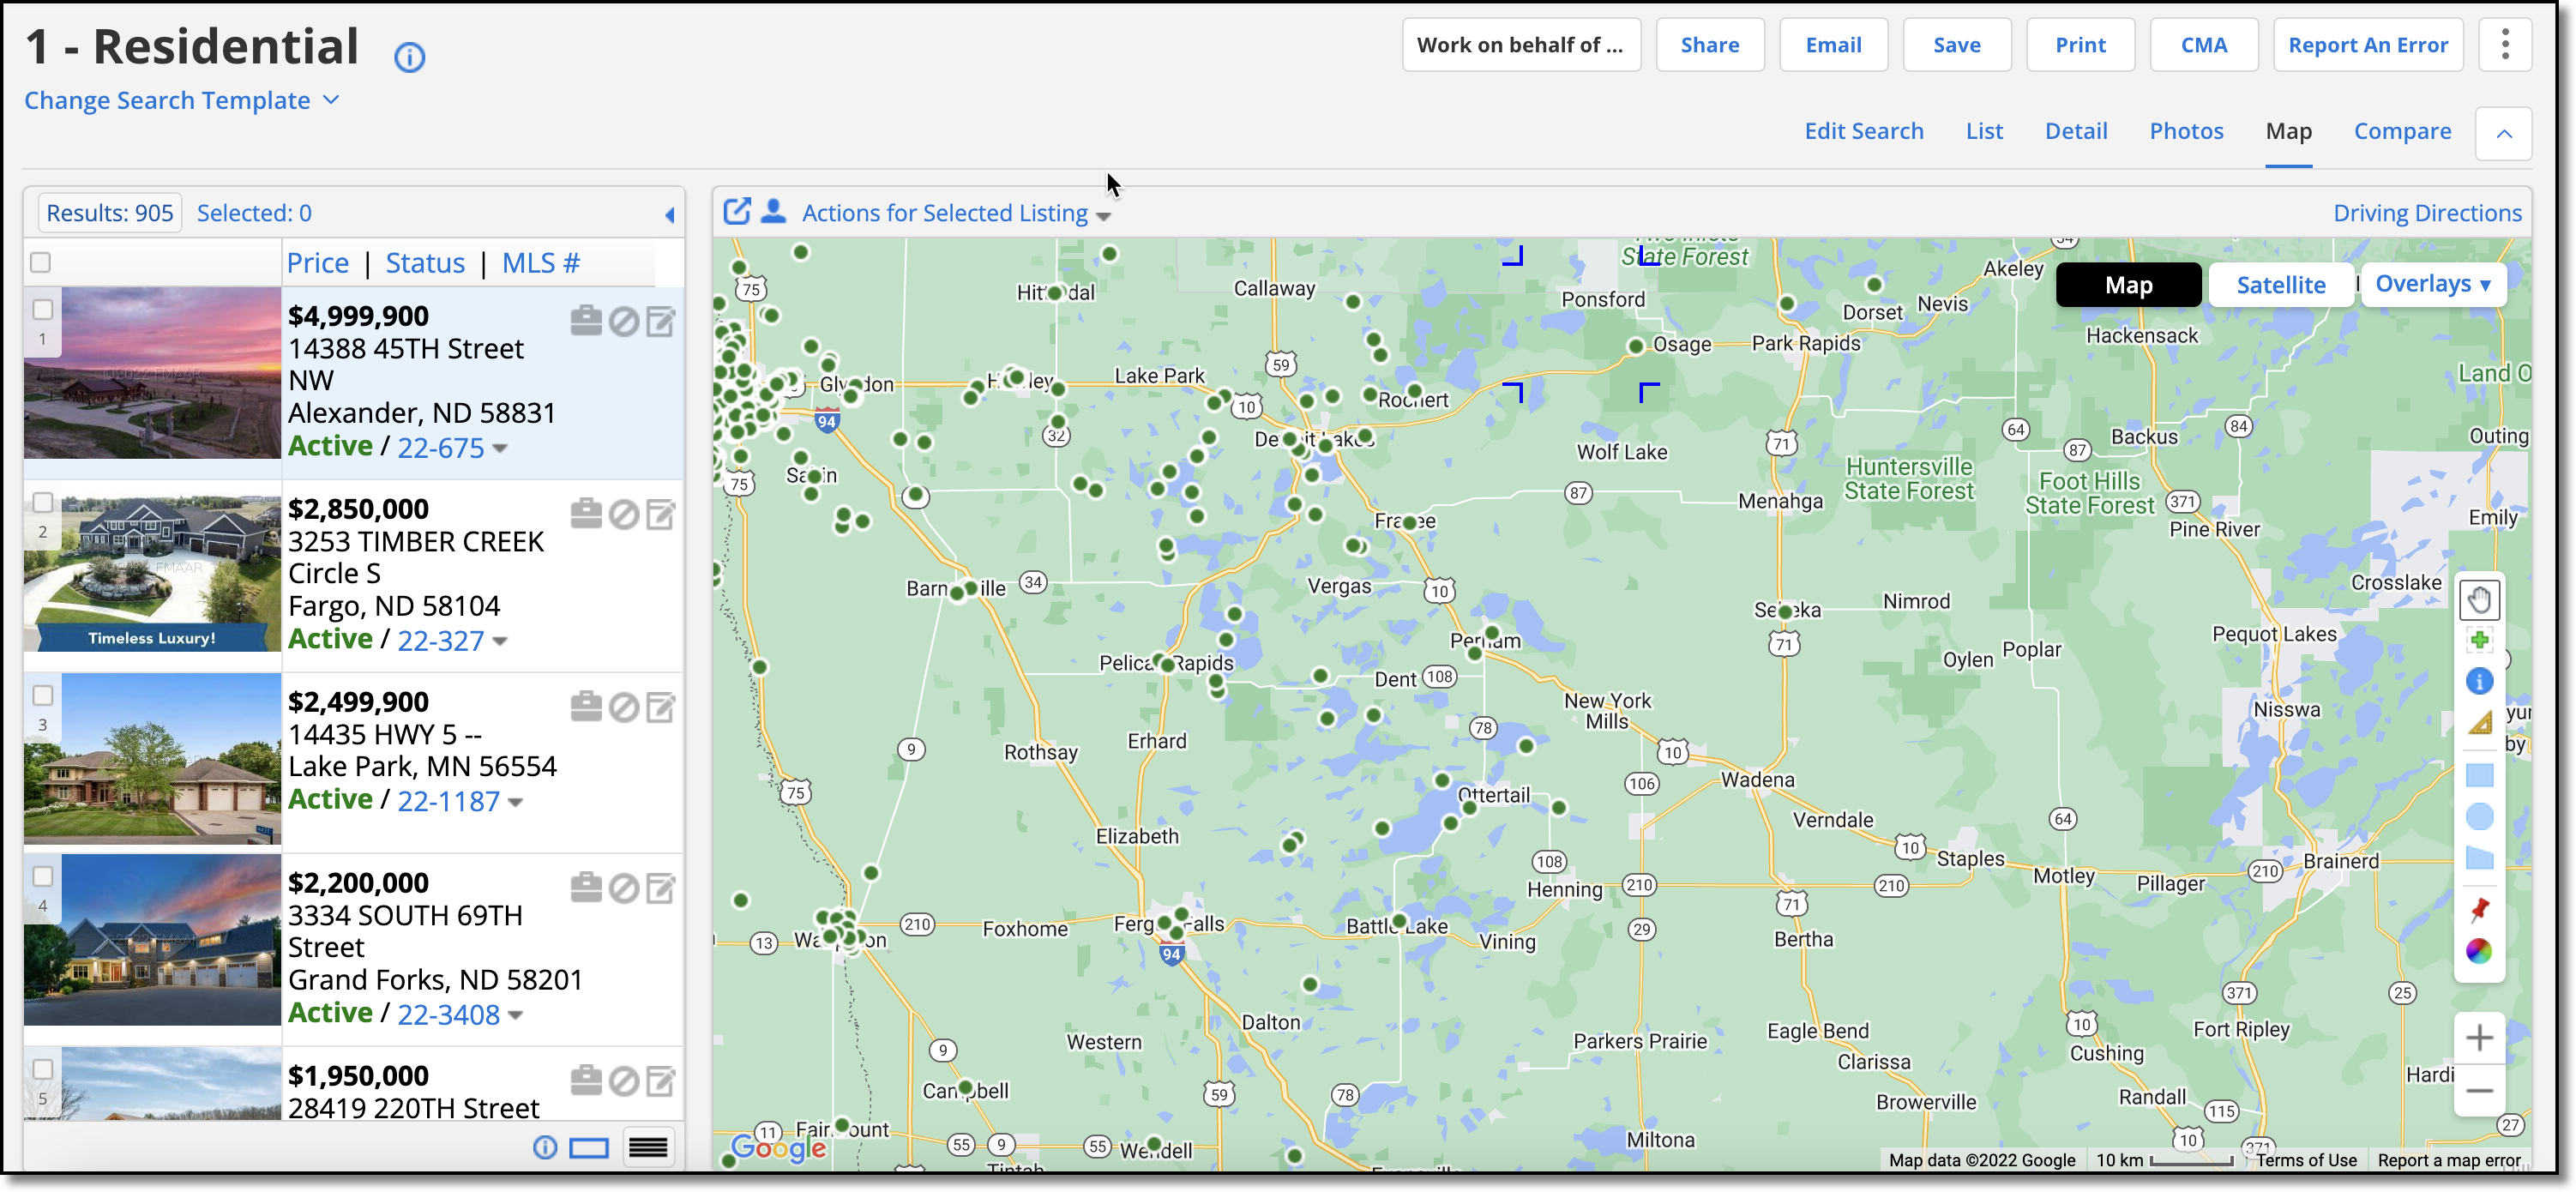
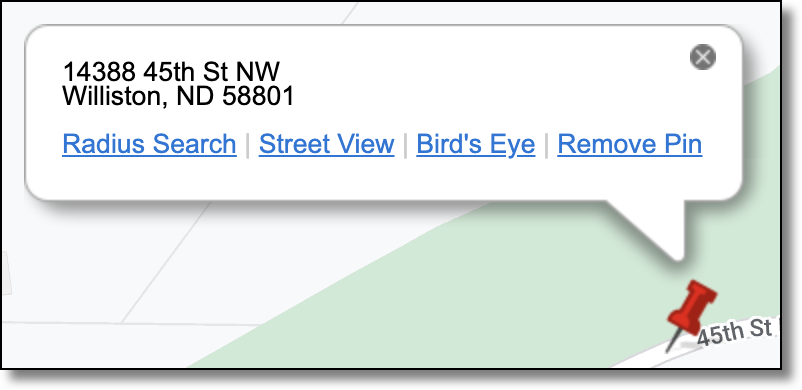
Listings are shown on the map with listing icons identifying their location. Click on a listing icon to open a listing bubble with the address, price and a mini-history of the listing.
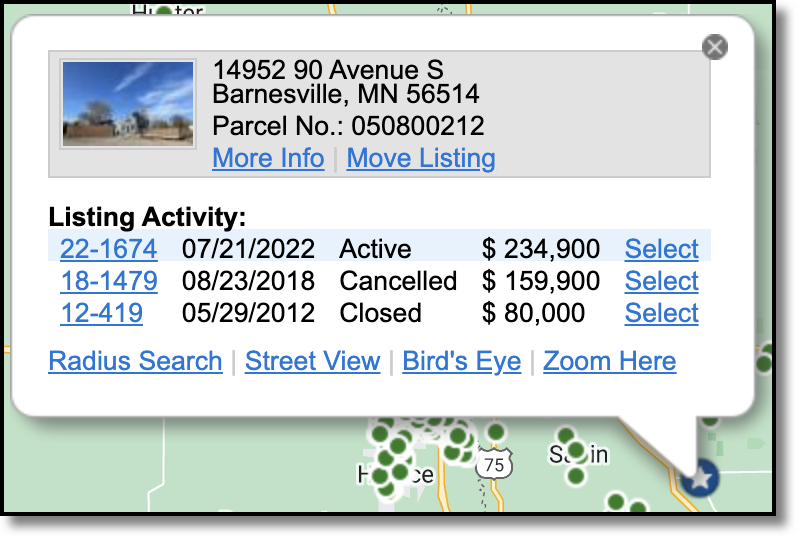
The following options are available from the listing bubble:
More Info – Open the single-listing view for the listing in the summary panel.
Move Listing – Change the location of the listing if you believe it is mapped incorrectly. If you can edit the listing, you can change the map location directly. If you do not have permission to edit the listing, a Map Recommendation message will be sent to the listing/co-listing agent.
Radius Search – Add a search radius to the search criteria. Specify a distance to search within. For more information, see Radius Searching in Flexmls.
Street View – Open a street view of the property.
Bird's Eye (where available) – Open an aerial image of the property.
Zoom Here – Zoom into the map at the selected location.
Select properties in the search results and click Driving Directions at the top of the map to create a driving route. On the page that opens, you can click and drag addresses to reorder the listings. By default, the listings will be in the same order that they are displayed in the search results. If viewing only selected listings, you can drag and drop them into a preferred order before you click Driving Directions.
If you add a location to your search, the map view and zoom level automatically adjust to show the area where the search results are located. To move the map, use the following tools:
Pan – The Pan Tool is the default tool selection when you enter Flexmls Mapping. Using the Pan Tool, you can move the map in any direction. To use the Pan Tool, click the
 icon on the right-side menu, and move the map. When you release the mouse button, the map will stop moving.
Keyboard Pan – Use the arrow keys on your keyboard to pan the map in small increments.
Using a Touch-Based Device – When using a touch-based device, like a tablet computer, you can double-tap to zoom and use gestures to pan and use the search tools.
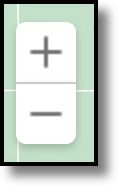
If you add a location to your search, the map view and zoom level automatically adjust to show the area where the search results are located. To adjust the zoom level to display a larger or smaller area, you have the following options:
Scroll Wheel – If your mouse is equipped with a scroll wheel, scrolling will increase or decrease the zoom level, centering the map at the cursor point.
Double-Click – Double-click at a point on the map to zoom and center at that location.
Zoom Arrows - To maintain the current map center but adjust the magnification, use the zoom arrows in the right side icon menu of the mapping page. Click the + or - buttons to move the zoom level up or down.
Zoom Tool – Click on the green plus sign
 to select the Zoom Tool. While the Zoom Tool is selected, you can click once to re-center the map at the click location, or you can click, hold, and release to draw a zoom area.
Shift + Pan Tool – Hold the shift key while the pan tool is selected to draw a zoom area (just like the Zoom Tool).
Next to the Zoom Tool, the Nosy Neighbor tool  allows you to click a point on the map to view listing information. The parcel dimensions, where available, are displayed on the map, along with a listing bubble containing a mini-history of the listing. Click Select to add one of the historical listings to the list in the left panel. Click on an MLS number to view the selected listing report in a separate browser tab.
Use the Measure tool  to measure distances on the map. Select the tool, click once on the map to begin measuring, and move the mouse to the first point you would like to measure. You can continue measuring segments on the map by repeating the process. Double-click to clear the current measurements and begin again.
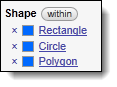
Draw rectangles, circles, and polygons on the map to define search areas. To remove a search area, locate the shape in the search criteria panel and click the X next to the shape name.
Rectangular Search Areas - Click on the rectangle shape
 , then click on the map to start the rectangle. Move your mouse until the rectangle is the desired size and click again to complete the shape.
Circular Search Areas - Click on the circle shape
 , then click on the map to set the center of your search. Move your mouse to increase the radius of the search from the center point and click again to complete the circle.
Irregular-Shaped Search Areas - Click on the polygon shape
 , then click on the map to start the polygon. Click to define the remaining search boundaries. The polygon can have as many points as you need to define your search area. Double-click to complete the shape.
Multiple Search Shapes - When using multiple search shapes, you can choose to search within all shapes, only at the intersections of shapes, or not within any of the shapes. To change your selection, click the word within directly above the shape names in the search panel at the left side of the page.
Editing Search Shapes - To edit a shape, click the name of the shape in the search criteria panel or click within the boundaries of the shape on the map. An information bubble appears with the name of the shape and the current color. To change the name or color of the shape, click edit. You can also edit the boundaries of the shape or remove it completely.
In Edit Shape mode, points appear on the boundaries of the shape. Click and drag a point to change the edge of a shape or click and drag the center point to change the location of the shape on the map. For polygons, you can also add points to the shape.
Back/Forward Buttons - Like your web browser, the Map tab includes back and forward buttons to move between views. To revert to the previous zoom level or focus, click the back button (left arrow). To return to the most recent zoom level or focus, click the forward button (right arrow).
See All Points on the Map - Click the button between the Back and Forward buttons to return to the initial map view where all plotted points are visible. This tool is helpful if you have moved the map to a point where you have lost perspective.
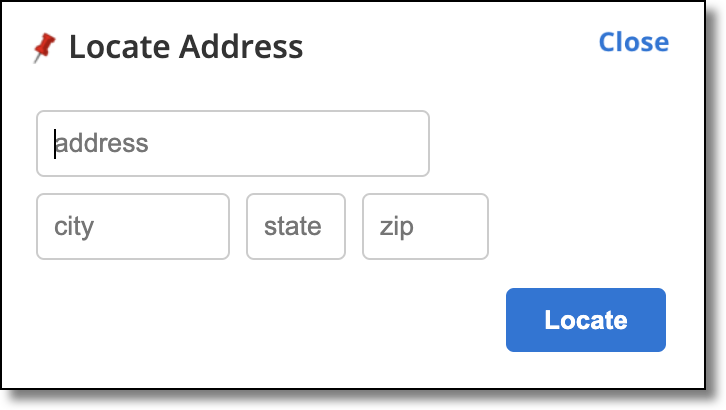
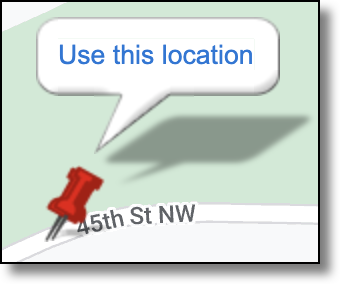
To find an address, click the pushpin icon in the lower right corner of the map. Enter address information in the pop-up window. If the address is found, the point will appear as a pushpin on the map. If there are multiple possible matches, a list of matching locations is displayed. If no locations match the address information you entered, edit the information or manually place the pushpin on the map. Click Use this location to open a listing bubble with the address and options to see a satellite view or street view of the property.
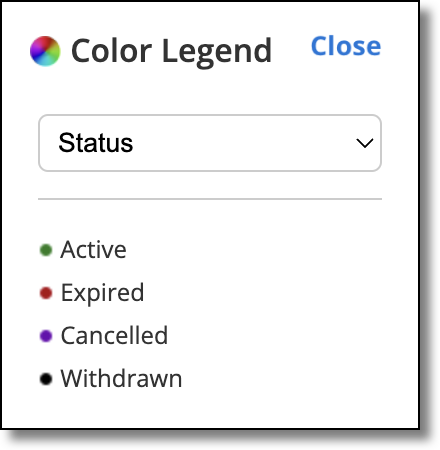
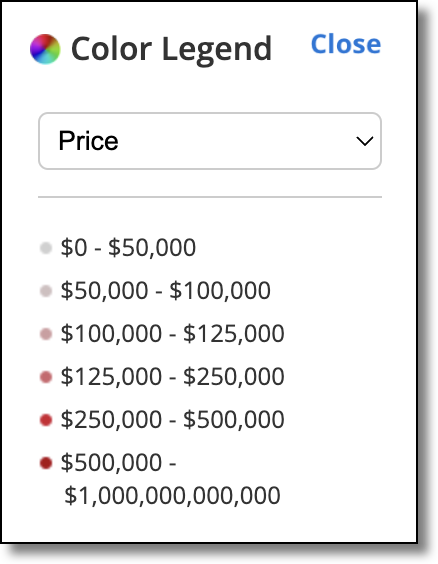
In the lower right corner of the map, click the color wheel icon  to open the color legend. The initial view of the color legend displays colors that correspond to the statuses of the listings that are plotted on the map. Click the drop-down arrow to display a gradient of colors that show listings by price or price/square foot. This feature allows you to visually track price trends among mapped listings.
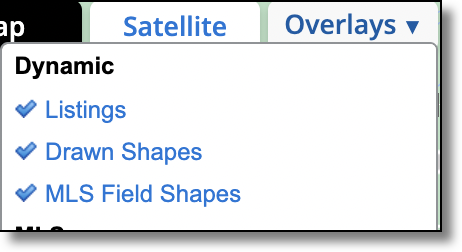
Click the drop-down list in the upper right corner of the map tab to view available dynamic overlays, overlays supplied by your MLS, and overlays that you have created. Click an overlay name to add it to the map. A check mark indicates that the overlay is currently being displayed. Click the name again to hide the overlay. Hiding an overlay does not remove associated search criteria.
Create your own map overlays to outline neighborhoods, school districts, or any area you want to define. For more information about creating custom map overlays, see My Map Overlays.
Use the Actions for Selected Listing drop-down list at the top of the map to select one of the following options:
Show More Information - Displays a mini report in the left panel while keeping the map visible on the right. View details about the listing or scroll through smaller versions of the photos in this single-listing view.
Add to Selected Listings - Add the current listing to the list that you have set aside for further action.
Show Street View - Open the street view of the listing in a new browser tab.
Show Bird’s Eye Map - Open an aerial image of the listing, if available, in a new browser tab.
Zoom to Listing - Adjust the map to the closest zoom level available for the selected listing.
Radius Search from Listing - Create a circle search shape with the selected listing as the center point. Enter a radius to designate the size of the circle.
Move this Listing - For your listings, use this option to correct the listing location. If the listing belongs to another member, use this option to suggest a new location for the listing.